Whiteboard app basics
Quickly open or create a new whiteboard or lesson in the whiteboard app. You can also open an existing whiteboard or lesson file from the Files Library. Once the file is open, you can add pages, change their background, expand the page to add more space, and more. If you’ve signed in to your SMART Account and have a Spark basic plan (Lumio Basic and Lumio Spark), you can also open a Lumio lesson in the whiteboard app. Whiteboards are automatically saved and can be found in the Files Library under Whiteboard.
Note
The first time you open a whiteboard, you’ll be prompted to choose a default location to save your whiteboard files: in the Files Library on the display, or in your Lumio account (if you’re signed in to your SMART Account). You can always change this default location later in the whiteboard settings.
To open a whiteboard
From the Home screen, tap Whiteboard
 to open your most recent whiteboard file in this session. If you haven’t accessed Whiteboard in the last few hours, this creates a new file.
OR
From the Home screen, tap Files Library
and locate the whiteboard file or Lumio lesson you want to open.Note
To access Lumio lessons from the Files Library, you must sign in to the display using your SMART Account.
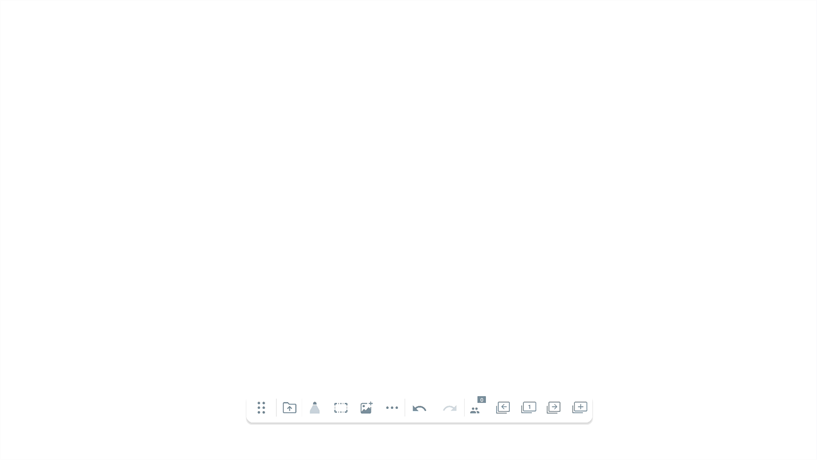
The whiteboard’s floating toolbar provides you with the following features. The tool’s icon turns blue when a tool is selected.

No. | Tool | Description |
|---|---|---|
1 | Move toolbar | Move the position of the toolbar by pressing this button and dragging it to a new location. Tip Drag the toolbar to the edge of the screen to change its orientation from horizontal to vertical. Dragging it to the left or right edge will make the toolbar vertical, while dragging it to the top or bottom edge will make the toolbar horizontal. |
2 | You can open the following:
| |
3 | Pen controls | Change the pen style, highlighter, or finger inking. Tap the Pen to open options for changing the style, color, and thickness of the pen. |
4 | Marquee tool | Tap the icon to use the marquee tool for selecting multiple objects on the whiteboard page. |
5 | Insert Media | Add images saved in the Files Library. Or add videos or royalty free images from the web using safe search engine. |
6 | Back | Back out of your group workspace. Only available when signed in to your SMART Account and using Lumio in a group workspace. |
7 | Group settings | Track and manage the status of your group activity. Only available when signed in to your SMART account and using Lumio in a group workspace. |
8 | More tools | SeeMore tools |
9 | Undo/Redo | Undo and redo actions. |
10 | Participation panel | Tap the icon to open the participation panel. This panel shows the currently connected participants and the information participants need for connecting to the lesson from their own devices. |
11 | Page tools | Use the page tools to perform the following actions:
|
12 | Add page | Add new pages such as blank pages, graphic organizers, manipulatives, and external files. |
Tap  on the whiteboard toolbar to view more whiteboard tools.
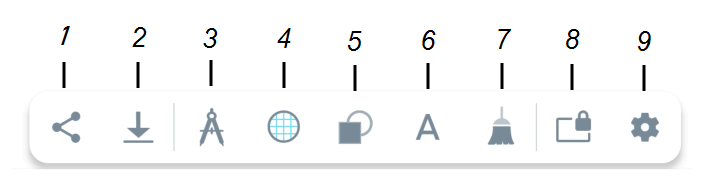
No. | Tool | Description |
|---|---|---|
1 | Share | Share a copy of the whiteboard file. |
2 | Export | Export the whiteboard as a PDF or SMART Notebook file. |
3 | Measure | Insert a measurement tool. |
4 | Background | Choose a whiteboard-background. |
5 | Insert shapes | Select a shape to add to the canvas. |
6 | Text creator | Create a text box. |
7 | Clear canvas | Clear the canvas content. |
8 | Lock canvas | Lock the whiteboard’s canvas to the area currently visible in the whiteboard. This prevents panning and zooming in or out when working in the whiteboard. When locked, a message and yellow border appears on the screen indicating it’s locked. To unlock, tap this button again or the red Unlock button at the top of the screen. |
8 | Whiteboard settings | Change the whiteboard settings. |