Using the TeamWorks app for Windows
Use the SMART TeamWorks 5 app to join a workspace, remotely or in-person. If your organization has set up a workspace host account for you, you can sign in and access additional features.
With a workspace host account | No workspace host account (free version) |
|---|---|
Store up to 2 GB of saved workspaces (whiteboards). | Store up to 100 MB of saved workspaces (whiteboards). |
Create personal workspaces and invite other contributors to collaborate. | Not available. |
Use the SMART TeamWorks app for Windows 10 computers to join a SMART TeamWorks Room meeting. From the TeamWorks app, you can contribute to the workspace and collaborate with other participants. You can also control the session remotely.
Choose the sign in option you want to use (Microsoft, Google, Apple) and follow the prompts to sign in.
OR
If your admin has set up a TeamWorks cloud account for you, use the credentials the admin provided to sign in.
Change account details, such as your photo, display name, location, and more. You can also see how much storage you have left and access security settings to set up Multi-Factor Authentication for signing in to the TeamWorks app.
To view and edit account details
Click your profile icon.

Click the setting or account detail you want to edit.
Requires account activation in the SMART TeamWorks Admin Portal. Learn more.
Use the app to create personal workspaces that you can invite others to contribute to and transfer to a meeting room. The app lists all the workspaces you have been invited to and created.
By default, you will always see a Personal room workspace.
To create new personal workspace
Expand the floating app menu.
Click Workspaces > New Workspace
 .
.Add a name for the workspace.
Click Manage members.
Click Add
 next to Members to search for people to add.
OR
Click Add
 next to Invitations to invite people via email to collaborate.
Tap Create.
To delete (leave) a workspace
Click the workspace.
Click Leave Workspace.
Method 1
If the meeting host has sent you a meeting link, click the link to join the workspace.
Method 2
Expand the floating app menu.
Click Present and collaborate.
Enter the room’s PIN provided on the display in the meeting room you are trying to join.
Click Connect.
To access the full drop-down toolbar, the meeting organizer must give you Write access. See Managing participants.
To capture a picture using the front facing camera
Click the drop-down toolbar.

Click Capture
 .
.Click Camera
 .
.The TeamWorks app takes a picture.
Click
 .
.
See Inserting and working with files to read about interacting with pictures.
To capture a video using the front facing camera
Click the drop-down toolbar.

Click Capture
 .
.Click
 .
.The TeamWorks app starts recording a video.
When you’re finished recording, click
 .
.Click
 to add the video to the workspace.
See Inserting and working with files to interact with the video.
To create a screen capture of an area of the screen
Open the drop-down toolbar.
Click
 .
.Click and drag the cursor over the area of the screen you want to capture.
Click
 .
.TeamWorks app takes a screen capture of the area you selected and inserts it on the workspace page.
See Inserting and working with files to interact with the video.
To create a screen capture of the whole screen
Join or start a meeting.
Open the drop-down toolbar
Tap
 .
.The TeamWorks app takes a screen capture of the entire screen and inserts it on the workspace page.
See Inserting and working with files to interact with the video.
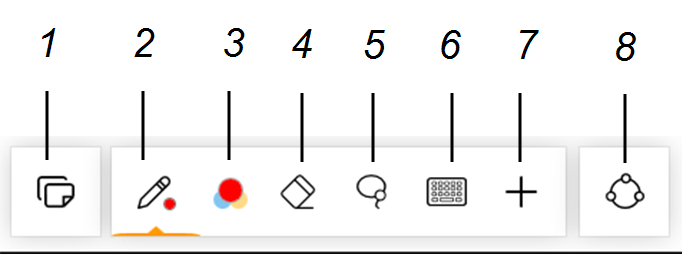
Use the workspace toolbar to perform a variety of actions in the workspace, such as adding files, recording meetings, connecting remote participants, and more. To access the full toolbar, the meeting organizer must give you Write access. See Inviting participants, other rooms, and moderating meetings.

Number | Description |
|---|---|
1 | Manage pages. See Adding and managing workspace pages. |
2 | Change the pen tool’s settings, such as the ink color, style, and thickness. See Writing and drawing in the workspace. |
3 | Select the ink color. You can customize and save up to six different colors. If you’re using a SMART Board interactive display, selecting an ink color in SMART TeamWorks Room overrides the interactive display’s pen color. |
4 | Enable the eraser tool and select the eraser size. |
5 | Enable the lasso tool. Use this tool to select an area of digital ink to move, resize, or rotate. |
6 | Open the on-screen keyboard. |
7 | Show the additional tools. See Additional tools. |
8 | Connect to a whiteboard or share whiteboard. |

Icon | Description |
|---|---|
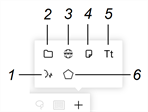
1 | Use voice commands to complete common tasks within TeamWorks Room. See Using Hey, TeamWorks voice commands. |
2 | Insert and present a variety of file types in a workspace page. See Inserting and working with files. |
3 | Add a web browser object to the workspace page. See Inserting and using web browsers. |
4 | Insert sticky notes in the workspace. See Inserting and using sticky notes. |
5 | Add text to the workspace page. See Adding text to the workspace. |
6 | Insert a shape. See Inserting and working with shapes. |
When you close a workspace, you can create a recap of the workspace. Recaps are saved as a PDF that includes screen captures of each page in the workspace.
Note
When you create a recap with the TeamWorks app, none of the files in the meeting are included with the recap.
To leave a workspace
Click
 .
.Click
 to create a recap.
OR
Click
 to leave the workspace without creating a recap.
Select the pages you want to include, or select Select All to include all the pages.
Tap
 .
.If the workspace included files, you can include them as separate files in the recap.
Tap
 .
.Select a local or cloud storage location for saving the recap.
Tap
 .
.Name the recap, and then and tap
 .
.