Adding text to the workspace
Use the Text button in the workspace’s toolbar to add text to the page. You can add text with a keyboard or by using the voice-to-text feature. After you’ve added text to a page, it becomes a text object that you can manipulate in a number of ways. See Moving, resizing, and rotating objects in the workspace.
You can also write in digital ink, then convert the ink to text.
On the workspace toolbar, tap
 to open the additional tools.
Tap
 .
.Note
By default, you can insert up to 10 elements in a workspace page. To change this default, open Settings and change the Maximum elements per page under Workspace Settings.
Tap within the text object box and start typing.
OR
Tap
 to show the additional text menu.
Tap
 and start speaking. TeamWorks Room converts your speech to text on the page.
Note
Windows may prompt you for permission to use the microphone
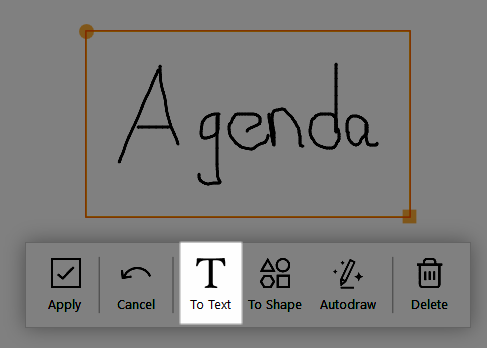
To convert ink to text
Write your text in digital ink.
Tap
 and draw a circle around the ink you want to convert to text.
From the object toolbar that appears, tap To Text.

The ink is converted to text.
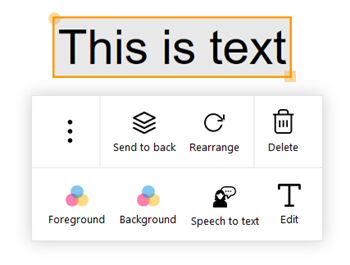
More tools appear for changing the text's format.
If the text object toolbar isn’t visible, select the text object to make it appear.

Use these options to manipulate the text objects:
Send to back
Makes the object appear under the other objects on the workspace page.
Rearrange
Returns the text to its original orientation.
Note
To manipulate the text, use the yellow circle on the text object’s border to rotate, and use the yellow square to resize.
Delete
Deletes the text object.
Foreground
Selects the text color.
Background
Selects the background color.
Speech to text
Allows you to dictate to the workspace, and SMART TeamWorks converts your speech to text.
Edit
Allows you to edit the text.
Open (tap
 )
)Opens the text in Windows’ Notepad application.
Clone (tap
 )
)Duplicates the object.