Inserting and working with files
When you add files to your page (such as images, videos, PDFs, or Word documents), they’re inserted as dynamic objects. You can move, resize, or rotate them and interact with them in a variety of other ways. Different types of objects provide different options for manipulating them.
You can insert the following types of files into the workspace:
Microsoft Office files (PowerPoint, Word, Excel)
PDFs
images
.mp4 videos
Notes
Some file types, such as Microsoft PowerPoint or Excel files, require that the program for that file be installed on the meeting room’s computer.
All files (except video files, images, browser pages) are inserted as a PDF in the workspace page. PDF files are compatible with all devices, so when you send the files as part of a meeting recap, the recipients can open them.
Browsers you start will open in incognito mode—the browser won’t save your browsing history, cookies and site data, or information entered in forms.
To insert a file
Tap
 and then
 to open the file manager.
Tips
Connect to your professional cloud drives to add files:
Connect to your network drives to add files
Browse to the file you want to insert.
Drag the file to the workspace page.
Tip
You can select multiple files at the same time and insert them into the workspace.
After a file is added to a page, you can perform additional actions on it.
Note
By default, you can insert up to 10 elements in a workspace page. To change this default, open Settings and change the Maximum elements per page under Workspace Settings.
To work with a file in the workspace
If the file’s object toolbar isn’t visible, select the file to make it appear.
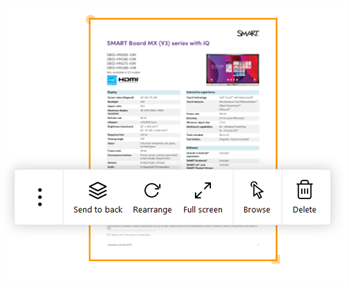
Use the following options to work with the object:
Send to back
Makes the object appear under the other objects on the workspace page.
Rearrange
Returns the file to its original orientation.
Note
To manipulate the file, use the yellow circle on the file object’s border to rotate, and use the yellow square to resize.
Full screen
Expands the object to occupy the entire screen. To exit full screen, tap  at the bottom of the screen and then tap Exit Full screen.
Browse
Browse through the file’s pages.
Note
When in Browse mode, the object’s position and size is locked. To exit Browse mode, tap
 then tap Move.
Delete
Deletes the file from the workspace page.
Open (tap
 )
)Opens the file in its default Windows program.
Send by email (tap
 )
)Sends the file via email (this option appears only when a default email client is configured).
Clone (tap
 )
)Clones the file as a new file object in the workspace page.
Clone as image (tap
 )
)Clones the file as an image object in the workspace page.
After inserting a file with multiple pages, such as a PDF or Word document, you can double tap the file object to expand it to full screen and start presenting the file. Swipe left or right to browse through the pages, and use the SMART Board interactive display’s pens to draw or makes notes over the file. Digital ink you add stays with the page
To insert images
Tap
 and then
 to open the file manager.
Tips
Connect to your professional cloud drives to add files:

Connect to your network drives to add files

Browse to the image you want to insert.
Drag the image to the workspace page.
Tip
You can select multiple images at the same time and insert them into the workspace.
After an image is added to a page, you can perform additional actions on it.
Note
By default, you can insert up to 10 elements in a workspace page. To change this default, open Settings and change the Maximum elements per page under Workspace Settings.
To manipulate image objects
If the image’s object toolbar isn’t visible, select the image to make it appear.
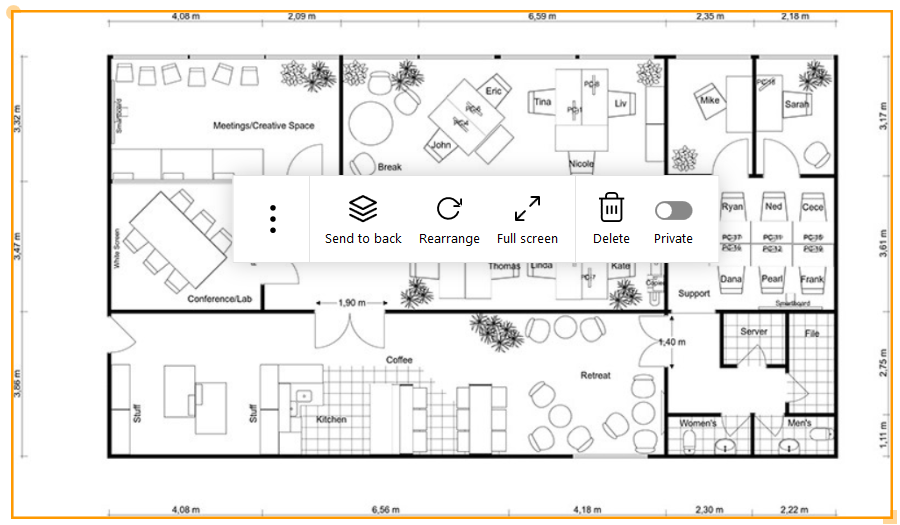
Use the following options to work with the object:
Send to back Makes the image appear under the other objects on the workspace page.
Rearrange Returns the image to its original orientation.
Note
To manipulate the image, use the yellow circle on the image’s border to rotate, and use the yellow square to resize.
Full screen Expands the image to occupy the entire screen. To exit full screen, tap  and then tap Exit Full screen.
Delete Deletes the image from the workspace page. Open (tap
 )
)Opens the image in the computer’s default program for images.
Send by email (tap
 )
)Sends the image via email (this option appears only when a default email client is configured). Clone (tap
 )
)Clones the image as a new image object in the workspace page
In the workspace, tap
 to open the file manager.
Tips
Connect your professional cloud drives to add videos:

Connect to your network drives to add videos:

Browse to the video you want to insert.
Drag the video to the workspace page.
Tip
You can select multiple videos at the same time and insert them into the workspace.
After a video is added to a page, you can perform additional actions on it.
To manipulate video objects
If the video’s object toolbar isn’t visible, select the video to show it.
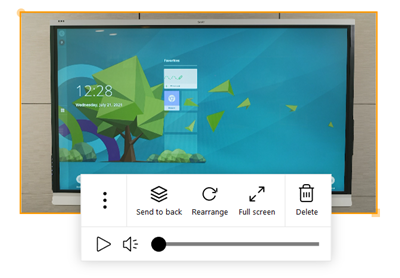
Use the following options to work with the object:
Send to back Sends the video object to the back layer of the page.
Rearrange Returns the video to its original orientation.
Note
To manipulate the video, use the yellow circle on the video’s border to rotate, and use the yellow square to resize.
Full screen Expands the video to occupy the entire screen. To exit full screen, tap  at the bottom of the screen and then tap Exit Full screen.
Delete Deletes the video from the workspace page. Open (tap
 )
)Opens the video file in the computer’s default program for video files.
Send by email (tap
 )
)Sends the video file via email (this option appears only when a default email client is configured). Clone (tap
 )
)Clones the video as a new video object in the workspace page Clone as image (tap
 )
)Clones the video as an image object in the workspace page.