Importing resources
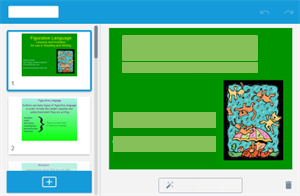
Import an existing resource into Lumio, such as a Microsoft PowerPoint, PDF, SMART Notebook file, Lumio, or Google file. When you import, you can choose to import the entire file or just the pages you select.
After importing a resource, you can open it in Editing mode and add more content such as activities, videos, blank whiteboard pages, or import another file to combine it with your current file.
To import a file as a new lesson, click
 Import or drag the file into your My Library tab or into your shared library.
OR
To add the imported file to an existing lesson, open the lesson in Editing mode, browse to the page that you want the imported file to be inserted after and click Add
 .
.The Add page window appears.

Click Import resource to open its drop-down menu.
Select one of the following options:
Option
Description
My computer
Choose this option to import a file saved locally on your computer.
When you select this option, the Browse window opens where you can navigate to the file’s location on your computer, select it, and click Open.
Google Drive
Choose this option to import a file saved to your Google Drive.
Important
You must have Lumio connected to your Google Drive to see this option. Learn more about using Google Drive with Lumio.
When you select this option, the Select a file window opens showing your Google Drive files. Navigate to the file you want, select it, and click Select.
My Library
Choose this option to import a file already saved in your files (the files in your My Library tab). This is useful if there are pages from an existing file that you want to use in a new lesson without having to duplicate the whole lesson.
When you select this option, a window opens showing all your existing Lumio lessons. Choose the lesson you want and then click Select.
Tip
Find the resource you want quickly by organizing the list of lessons by date added or by name. You can also use the search bar to make finding a specific lesson even easier.
Shared Libraries
Choose this option to import a resource from a shared library that you belong to.
Import editable files (beta)
My computer (editable)
Choose this option to import a PDF or PowerPoint and have all the content from those files become editable objects.
Note
This is a beta feature.
Google Drive (editable)
Choose this option to import a Google Slide or Google Docs file saved to your drive and have all the content in those files become editable objects.
Important
You must have Lumio connected to your Google Drive to see this option. Learn more about using Google Drive with Lumio.
Note
This is a beta feature.
Once the file has been selected for import, a window opens showing all the pages in that file. You can choose the Select all option to import all the pages in the file, or select individual pages to import.
Once you are finished selecting which pages to import, click Add.
After the file is imported, it opens in Editing mode.

From Editing mode, you can either modify the lesson you just imported or select Finish Editing.
Note
When you use the editable import option for Google, PowerPoint, or PDF files, or when you import a SMART Notebook file, each page is imported with editable objects. Select an object or piece of text to reveal controls for unlocking, moving, rotating, resizing, duplicating, or deleting it.
When creating Lumio or SMART Notebook files, keep in mind that some features are not compatible between software platforms. Also, some formatting doesn’t transfer perfectly from SMART Notebook to Lumio and vice versa.
Lumio only |
|
SMART Notebook only |
|
Use with caution |
|
Select an object or piece of text to reveal controls for unlocking, moving, rotating, resizing, duplicating, or deleting it. Double-click within a text box to add or remove text, and use the text editing toolbar to change properties, such as font, size, and color.
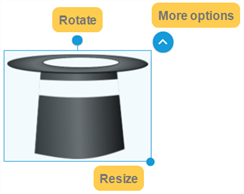
When you tap an imported object (such as text, images, shapes, or lines) using the selection tool , a rectangle appears around it.
For most objects, such as images, text, and shapes, you can rotate and resize the object using the circular handles.

For lines you can adjust the line’s length or orientation by clicking and dragging one of the line’s end points.
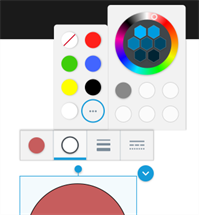
For text, lines, and shapes, you can also change properties using the object’s toolbar that appears when you select the object.

Click![]() to reveal more options including locking the object in place, duplicating it, converting it to an Infinite Cloner The Infinite Cloner locks an object in place and transforms it so that students can select and drag to continue pulling out infinite copies of the object., or deleting it. See Editing presentation pages for more on how to manipulate objects.
to reveal more options including locking the object in place, duplicating it, converting it to an Infinite Cloner The Infinite Cloner locks an object in place and transforms it so that students can select and drag to continue pulling out infinite copies of the object., or deleting it. See Editing presentation pages for more on how to manipulate objects.
If the object you select was locked in place by the person who created the lesson, a lock appears in place of the delete and duplicate buttons.

Tap the lock to unlock the text.
Double-click within the text’s selection rectangle.
If the text is editable, the text editing toolbar appears along with a pop-up at the bottom of the screen that explains how to undo changes.
Note
The ability to edit text in a SMART Notebook lesson depends on how the text was added by the person who created the lesson. Text that was typed directly into the lesson can be edited, but text that was added as an image can only be moved, rotated, resized, locked, duplicated, cloned, or deleted.
Make the changes that you want.
Note
Some formatting doesn’t transfer perfectly from SMART Notebook to Lumio. When you begin editing text, the spacing and alignment of the original text might change.
Tap outside the text selection box to make your changes permanent.
OR
Press the Esc key on the keyboard or click Cancel in the pop-up to undo the changes.
