Using advanced object features
Using SMART Notebook software, you can not only present information to students but also engage them in interactive lesson activities.
You can create lesson activities by inserting objects such as shapes, pictures and tables, and using features such as the Activity Builder and scaling gesture.
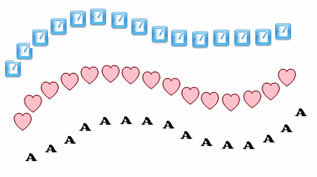
SMART Notebook software includes eight Creative pen styles (see Writing, drawing and erasing digital ink). In addition to these styles, you can create your own styles using pictures or objects on the currently selected page.

To create a custom Creative pen using a picture
Press Pens
 .
.The Pen tools buttons appear.

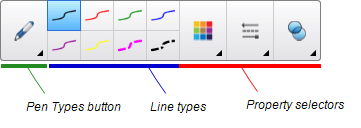
Press Pen Types, and then select Creative Pen.
Select a line type.
If the Properties tab isn’t visible, press Properties
 .
.Press Line Style.
Select Use a custom stamp image.
Click Browse.
The Insert Image File dialog box appears.
Browse to and select the picture you want to use for the Creative pen style.
Press Open.
Write or draw digital ink on the page.
Tip
To resume using the default line type, select Use the default pattern.
If you want to save your custom Creative pen style for future use, press Save Tool Properties. You can later reset the Creative pen style (see Customizing the toolbar).
To create a custom Creative pen using an object
Press Pens
 .
.The Pen tools buttons appear.

Press Pen Types, and then select Creative Pen.
If the Properties tab isn’t visible, press Properties
 .
.Press Line Style.
Select Use a custom stamp image.
Press Select object, and then select an object on the page.
Write or draw digital ink on the page.
Tip
To resume using the default line type, select Use the default pattern.
If you want to save your custom Creative pen style for future use, press Save Tool Properties. You can later reset the Creative pen style (see Customizing the toolbar).
You can link any object on a page to a web page, another page in the file, a file on your computer or an attachment. An attachment is a copy of a file, a shortcut to a file or a link to a web page that you add to the Attachments tab.
Note
You can display animated link indicators around all links on a page (see Displaying links).
To add a link to a web page
Select the object.
Press the object’s menu arrow, and then select Link.
The Insert Link dialog box appears.
Press Web Page, and then type the web address in the Address box.
If you want to open the link by pressing an icon, select Corner icon.
OR
If you want to open the link by pressing anywhere in the object, select Object.
Press OK.
If you selected Corner icon, the
 icon appears in the lower-left corner of the object.
To add a link to another page in the file
Select the object.
Press the object’s menu arrow, and then select Link.
The Insert Link dialog box appears.
Press Page in this File, and then select an option in the Select a page area.
If you want to open the link by pressing an icon, select Corner icon.
OR
If you want to open the link by pressing anywhere in the object, select Object.
Press OK.
If you selected Corner icon, the
 icon appears in the lower-left corner of the object.
To add a link to a file on your computer
Select the object.
Press the object’s menu arrow, and then select Link.
The Insert Link dialog box appears.
Press File on this Computer, and then type the file’s location and name in the File box.
If you want to attach a copy of the file, select Copy of file.
OR
If you want to insert a shortcut to the file, select Shortcut to file.
If you want to open the link by pressing an icon, select Corner icon.
OR
If you want to open the link by pressing anywhere in the object, select Object.
Press OK.
If you selected Corner icon, the
 icon appears in the lower-left corner of the object.
To add a link to an attachment
Select the object.
Press the object’s menu arrow, and then select Link.
The Insert Link dialog box appears.
Press Current Attachments, and then select the attachment in the list.
If you want to open the link by pressing an icon, select Corner icon.
OR
If you want to open the link by pressing anywhere in the object, select Object.
Press OK.
If you selected Corner icon, the
 icon appears in the lower-left corner of the object.
To remove a link
Select the object.
Press the object’s menu arrow, and then select Link.
The Insert Link dialog box appears.
Press Remove Link.
You can add a sound to any object (except Adobe Flash Player compatible files and widgets) by attaching a sound file or recording a sound using a computer microphone. You can play the sound during the lesson by pressing an icon in the corner of the object or the object itself.
Note
SMART Notebook software supports the MP3 audio format.
To add a sound file to an object
Select the object.
Press the object’s menu arrow, and then select Sound.
A dialog box appears.
Press Browse (for Windows operating systems). The Insert File dialog box appears. For OS X operating systems, press Choose File. The Open dialog box appears.
Browse to and select the sound file, and then press Open.
Select Corner Icon if you want to play the sound file when you press an icon in the object’s lower-left corner.
OR
Select Object if you want to play the sound file when you press anywhere on the object.
Press Attach Sound.
To add a recorded sound to an object
Connect a microphone to your computer and turn it on.
Select the object.
Press the object’s menu arrow, and then select Sound.
A dialog box appears.
Click Start Recording.
Record the sound using the microphone.
Important
SMART Notebook software stops recording after one minute. Therefore, ensure the sound is no more than one minute long.
Click Stop Recording.
Type a name for the sound in the Recording name box.
Optionally, click Preview Recording to hear the sound before adding it to the object.
Select Corner Icon if you want to play the sound file when you press an icon in the object’s lower-left corner.
OR
Select Object if you want to play the sound file when you press anywhere on the object.
Press Attach Recording.
To remove a sound from an object
Select the object.
Press the object’s menu arrow, and then select Sound.
A dialog box appears.
Press Remove Sound.
You can animate an object to fly onto a page from the side, spin, fade in, shrink and more. You can set the animation to start when you open a page or when you press the object.
To animate an object
Select the object.
If the Properties tab isn’t visible, press Properties
 .
.Press Object Animation.
Select options in the Type, Direction, Speed, Occurs and Repeats drop-down lists.
You can lock an object to prevent its modification, movement or rotation. Alternatively, you can lock an object but limit its movement either vertically or horizontally, or allow more movement and rotation.
You can remove this lock at any time.
To lock an object
Select the object.
Press the object’s menu arrow, and then select Lock > Lock in Place.
You’re unable to move, rotate or modify the object until you unlock it.
Note
If you press a locked object, a lock icon
 appears instead of a menu arrow.
To lock an object but allow its movement
Select the object.

Press the object’s menu arrow, and then select Lock > Allow Move.
You can move the object but you’re unable to rotate or modify it until you unlock it.
Note
If you press a locked object, a lock icon
 appears instead of a menu arrow.
To lock an object but allow its movement vertically
Select the object.
Press the object’s menu arrow, and then select Lock > Allow Vertical Move.
You can move the object vertically but you’re unable to rotate or modify it until you unlock it.
Note
If you press a locked object, a lock icon
 appears instead of a menu arrow.
To lock an object but allow its movement horizontally
Select the object.
Press the object’s menu arrow, and then select Lock > Allow Horizontal Move.
You can move the object horizontally but you’re unable to rotate or modify it until you unlock it.
Note
If you press a locked object, a lock icon
 appears instead of a menu arrow.
To lock an object but allow its movement and rotation
Select the object.
Press the object’s menu arrow, and then select Lock > Allow Move and Rotate.
You can move and rotate the object but you’re unable to modify it until you unlock it.
Note
If you press a locked object, a lock icon
 appears instead of a menu arrow.
To unlock an object
Select the object.
Press the object’s lock icon
 , and then select Unlock.
Keywords |
|
Related documents |