Adding images
Add images to the page using the following methods:
Tip
Change SMART Notebook’s image preferences to improve performance of .notebook files so your .notebook files open and run more quickly. See Setting image preferences to reduce file size.
After adding an image, you can do the following with the image:
If you have an image saved on the computer, you can add it using the Notebook menu.
To add an image saved on the computer
On the Notebook menu, select Insert
Picture.
Browse to and select the image you want to add.
Click Open.
The image is added to the page.
The Gallery tab provides access to a collection of thousands of pictures, multimedia objects and more, organized into subject-specific categories. Locate an image in the Gallery tab and then drag it onto the Notebook page to add it.
To add an image from the Gallery tab
Browse or search for an image.
Click and drag the image onto the Notebook page.
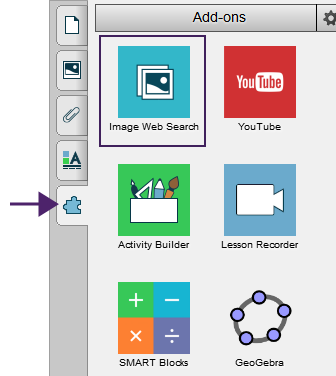
Use the Image Web Search add-on to browse the internet for royalty-free images that you can use in your lesson.
Tip
Not seeing this add-on? Make sure it’s enabled.
To add an image using Image Web Search
Open the Add-ons
 tab and tap Image Web Search.
Select to search for either pictures or clip art.
Type a search term for the image you’re looking for then tap Search
 .
.In the results pane, select the image you want and drag it to the Notebook page to add it.
If your .notebook files contain large pictures (pictures over 1 MB in file size), your files could open and run slowly. You can reduce the pictures’ file size without noticeably reducing their quality. As a result, your .notebook files’ overall file sizes will be smaller and the files will open and run more quickly.
To set image optimization preferences
Select Edit
Preferences (for Windows operating systems). The SMART Notebook Preferences dialog appears. For macOS operating systems, select Notebook
Preferences. A dialog appears.
Click Defaults.
Select one of the following options in the Image optimization drop-down list:
Ask every time I insert a large image to have the option of reducing or not reducing large pictures’ file sizes when you insert them.
Never change the resolution of inserted images to never reduce large pictures’ file sizes when you insert them.
Always change image resolution to optimize file size to always reduce large pictures’ file sizes when you insert them.
Click OK.
If you selected Ask every time I insert a large image in the Image Optimization drop-down list, you can manually reduce the size of large pictures when you insert those pictures in your file or afterwards.
To reduce the size of a large picture when inserting it in a file
Insert the picture.
After you click Open, the Image Optimization dialog appears.
Click Optimize to reduce the picture’s file size.
OR
Click Keep Resolution to not reduce the picture’s file size.
Notes
When you insert a BMP file, SMART Notebook software internally converts the file to PNG format. This conversion reduces the size of the file. As a result, you might not need to export an optimized version of the .notebook file (see Exporting optimized files) even if the BMP file is over 1 MB in size.
SMART Notebook software automatically reduces the file size of pictures over 5 MB or 5 megapixels regardless of which option you choose.
To reduce the size of a large picture after inserting it in a file
Select the picture.
Click the picture’s menu arrow, and then select Image Optimization.
The Image Optimization dialog appears.
Click Optimize.
If you have existing files that contain large pictures or if you chose Never change the resolution of inserted images in the Image Optimization drop-down list, you can export optimized versions of your files that contain reduced pictures. This is particularly useful when you need to present a .notebook file on an older or less powerful computer.
To export an optimized file
Select File
Export As
Optimized SMART Notebook File for . A dialog appears.
Browse to where you want to save the new file.
For Windows operating systems, type a name for the file in the File name box. For macOS operating systems, type a name for the file in the Save As box.
Click Save.