Using widgets on the display
To open the widget menu, open the Side Toolbar menu (see On-screen menus and controls) and tap the Toolbox icon .
.
Note
Widgets always appear on top of other open windows, programs, and connected devices.
The widget menu features the following tools and controls:
Icon | Widget | Function | For more information |
|---|---|---|---|
 | Clean | Closes all open apps and clears the display’s system RAM memory. | |
 | Countdown | Start a countdown timer. | |
 | Screen Capture | Use the Screen Capture widget to take a screen capture of a rectangular area, a freehand area, a window, or the entire screen. | |
 | Spotlight | Use the Spotlight widget during a presentation to draw attention to an area of a screen. | |
 | Calculator | Open an on-screen calculator. | |
 | Vote | Create instant polls and distribute them to your class or audience. | |
 | Lock Screen | Lock the screen. |
Use the Clean widget to close all open apps and clear the display’s system RAM.
To use the Clean widget
Tap the Clean icon
 .
.
Use the Countdown widget to display a countdown timer on the screen.
To open the Countdown widget
Tap the Countdown icon
 .
.The Countdown widget opens:
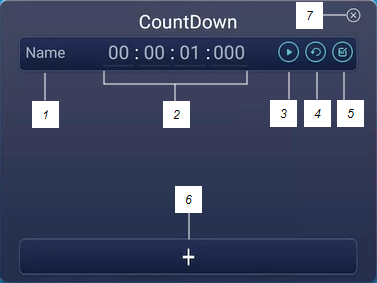
Tap the Edit icon
 to customize countdown timer settings.
No.
Tool
1
Type a name for the countdown activity.
2
Set a time for the duration of the countdown.
3
Start/pause the countdown.
4
Restart the countdown.
5
Edit the countdown’s duration.
6
Add additional countdown timers, up to a maximum of six.
7
Close the countdown widget.
To close the Countdown widget
Tap the Close icon
 .
.
The Screen Capture toolbar enables you to take a screen capture of a rectangular area, a freehand area, a window, or the entire screen.
To use the Screen Capture widget
Tap the Screen capture icon
 .
.The Screen Capture widget opens:
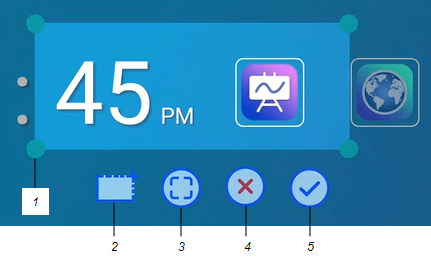
No.
Tool
1
Capture window re-size handle
2
Select a rectangular or circular window (click icon to switch between them)
3
Select the entire screen
4
Close the Screen Capture tool
5
Save the selected window or screen
Select the window or screen you want to capture.
Tap the Save icon
 to save the selected window or screen.
Save the file locally, to a USB drive, or to your Google Drive or OneDrive account.
Note
Google Drive or OneDrive cloud storage must be enabled in display settings.
To close the Screen Capture widget
Tap the Close icon
 .
.
You can use the Spotlight widget during a presentation to draw attention to an area of a screen.
To use the Spotlight widget
Tap the Spotlight icon
 .
.The Spotlight widget is activated:
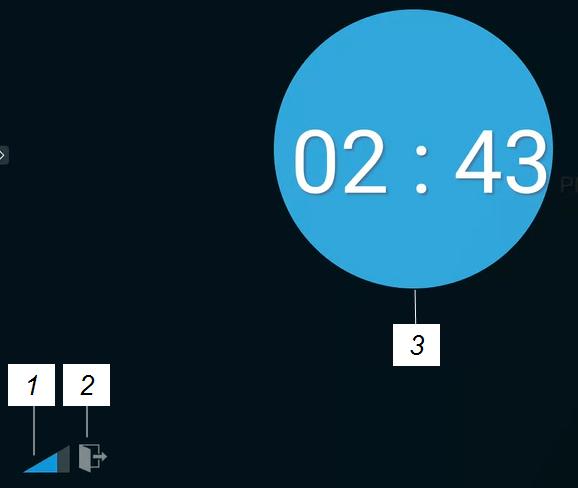
No.
Tool
1
Make the spotlight larger or smaller.
Tip
You can also use finger gestures to change the size of the spotlight area.
2
Close the Spotlight widget.
3
Spotlight area
Press and drag the Spotlight window to highlight an area of the screen.
To close the Spotlight widget
Tap the Close icon
 .
.
Open an on-screen calculator that appears in front of any application running on the display.
To use the Calculator widget
Tap the Calculator icon
 .
.To close the Calculator widget, tap Close.
Use the Vote widget to create instant polls and distribute them to your class or audience.
To use the Vote widget
- For information about using this widget, see Using Vote.
Use the Lock Screen feature to secure the display’s screen. When Lock Screen is enabled, a six digit passcode must be entered to un‑lock the screen.
Note
Creation of a Lock Screen passcode is part of the initial set up when the display is turned on for the first time. The Lock Screen feature can also be configured in display settings.
To lock the screen
- Tap the Lock Screen icon
 .
. A lock icon will appear on the screen and a password must be entered to un‑lock the screen.
To open the widget menu, open the Toolbar menu (see On-screen menus and controls) and tap the More icon .
.
You can also pin the widgets you use regularly to the Toolbar (see Favorite widget shortcuts).
Note
Widgets always appear on top of other open windows, programs, and connected devices.
The tools menu features the following tools and controls:
Icon | Widget | Function | For more information |
|---|---|---|---|
 | Input | Select an input and adjust brightness and volume. You can also access advanced options for configuring input settings. | |
| Overlay | Write on an overlay on top of any app, video, website, document, or image, including input from a connected computer. Saving to cloud storage is also supported. | |
 | Timer | Start a countdown timer. | |
 | Stopwatch | Start a stopwatch that counts up from zero for measuring elapsed time. | SeeUsing Stopwatch |
 | Spotlight | Use the Spotlight widget during a presentation to draw attention to an area of a screen. | |
 | Record | Use the Record widget to record your actions on the display. | |
 | Freeze | Freeze and zoom the current image on the screen. | |
 | PIP | Use the picture-in-picture (PIP) widget to show a different input in a smaller floating window while using other apps on the display. | |
 | Split screen | Use the Split screen widget to divide the screen into two parts, allowing you to use two different apps or widgets simultaneously. | |
 | Screen lock | Lock the screen. | |
 | Calculator | Open an on-screen calculator. | |
| Screen Capture | Capture screen captures of anything on the screen, including content from apps, websites, and videos. Select Freedom, Full, and window mode. You can add captured screens to a whiteboard and edit them. |
Select an input and adjust brightness and volume. You can also access advanced options for audio, screen, display, and image adjustment.
Use the Overlay widget to write or draw over the currently displayed screen contents. After you finish, you can save the overlay to the Files library. You can also save overlays directly to a Google Drive or OneDrive account.
To write or draw on an overlay
Tap the Overlay icon
 .
.Use the display’s pens or your finger to write or draw in digital ink.
If you want to keep the overlay, tap the Save icon
 to save the image file to the display in .png format.
OR
Tap the More icon
 and then the Cloud Drive icon
 to save the file to your Google Drive or OneDrive account.
This is will also save a copy of the .png file locally.
When you’re done, tap the Close icon
 to exit the overlay.
To erase ink on an overlay
Erase ink by moving your fist or palm over the digital ink.
OR
Tap the Clean icon
 and erase all the ink.
To share an overlay
If your mobile device has a QR code scanner, it can open an image of the overlay in a web browser.
Note
After the overlay image is shared, it isn't updated to reflect changes made at the display.
Tap the More icon

Tap the Share icon
 .
.Scan the QR code with your mobile device.
You’re prompted to open the image in your device’s browser.
When the image appears, you can save the image to your mobile device or share the image with others.
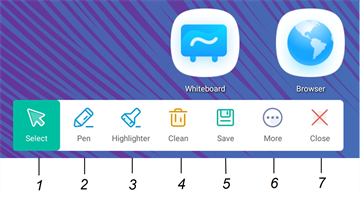
No. | Tool |
|---|---|
1 | Select tool. When the Select tool is active, your touch passes through the overlay and interacts with the screen contents behind it. |
2 | Pen tool. When the Pen tool is active, your touch draws digital ink on the overlay. Options are available for pen size and color. |
3 | Highlighter tool. When the Highlighter tool is active, your touch draws transparent digital ink on the overlay. Options are available for pen size and color. |
4 | Erase all digital ink on the overlay. |
5 | Save the current overlay. |
6 | Open File manager, insert an image, and access cloud storage. |
7 | Remove the overlay and close the Overlay widget. |
Use the Timer widget to display a countdown timer on the screen.
To use the Timer widget
Tap the Timer icon
 .
.The Timer widget opens:
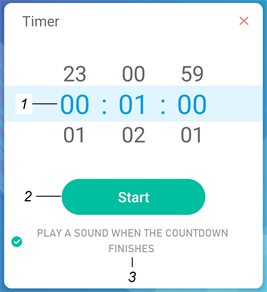
No.
Tool
1
Timer display (left to right): hours, minutes, seconds. Slide your finger up or down on the numbers to customize the countdown timer.
2
Start the countdown timer.
3
(Optional) enable the PLAY A SOUND WHEN THE COUNTDOWN FINISHES option to add an audible ring tone that sounds when the timer ends.
Tap Start to start the countdown timer.
This image and table describe the options available after the timer has started:
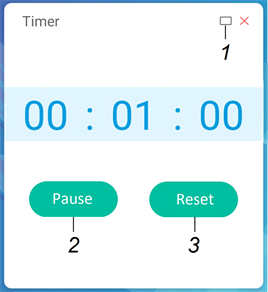
No.
Tool
1
Make the countdown timer full screen. Tap again to return to normal size.
Tap the screen anywhere other than the timer to make the timer a moveable floating window and move it around.
2
Pause the countdown timer.
3
Reset the countdown timer.
To close the Timer widget
Tap theClose icon
 .
.
Use the Stopwatch widget to count up from zero and measure elapsed time.
To use the Stopwatch widget
Tap the Stopwatch icon
 .
.The Stopwatch tool opens:

Tap Start to start the stopwatch.
This image and table describe the options available after the stopwatch has started:
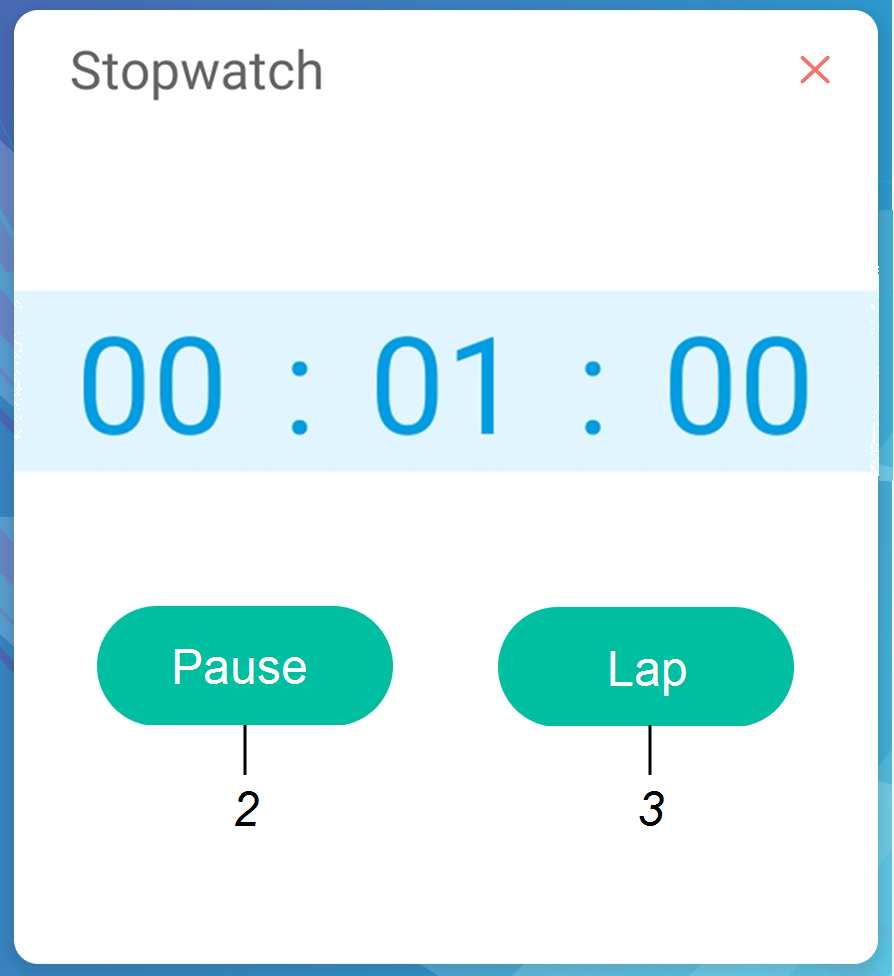

No.
Tool
1
Pause the stopwatch.
2
Record the current time and display it in a list of other times you’ve recorded.
3
Resume the stopwatch after pausing.
4
Reset the stopwatch to zero.
Tip
You can turn the Stopwatch widget into a moveable floating menu by tapping a different part of the screen.
To close the Stopwatch widget
Tap the Close icon
 .
.
You can use the Spotlight widget during a presentation to draw attention to a particular screen area.
To use the Spotlight widget
Tap the Spotlight icon
 .
.The Spotlight widget is activated:
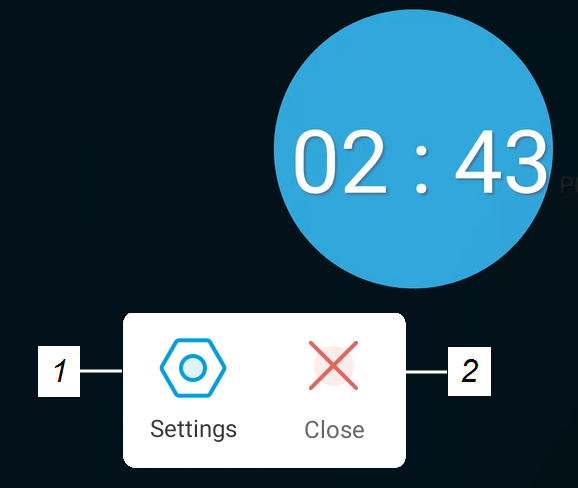
No.
Tool
1
Open Settings for controls that change the spotlight’s size and transparency.
Tip
You can also use finger gestures to change the size of the spotlight area.
2
Close the Spotlight widget.
Press and drag the Spotlight window to highlight an area of the screen.
To close the Spotlight widget
Tap the Close icon
 .
.
You can use the Record widget to record a video of the on-screen activity.
To use the Record widget
Tap the Record icon
 .
.The Record widget opens:
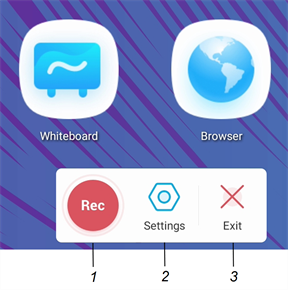
No.
Tool
1
Begin recording.
2
Open Settings for controls that change the video’s resolution and to select a location for the saved recording.
3
Close the Record widget.
(Optional) Tap Settings and change the default resolution and the location of the saved recording.
Tap the Rec icon
 to begin recording your actions on the display.
If you want to pause the recording, tap the Pause icon
 .
.
To resume recording, press the Resume icon
 .
.To stop the recording, tap the Stop icon
 .
.The recording is saved to the display.
To close the Record widget
Tap the Exit icon
 .
.
You can use the Freeze widget to temporarily freeze the screen.
Note
Freezing the screen does not pause running applications on the connected computer. It simply freezes the display of those applications.
To use the Freeze widget
Tap the Freeze icon
 .
.The Freeze widget appears and the screen is temporarily frozen:
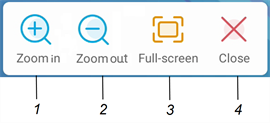
No.
Tool
1
Zoom into the current screen.
Tip
You can also use pinch-to-zoom finger gestures to zoom in or out.
2
Zoom out from the current screen.
3
Return to the default screen size.
4
Close the Freeze widget.
Press and drag the frozen image to move it on the screen, and use the zoom controls to focus on a specific detail.
To close the Freeze widget
Tap the Close icon
 .
.
The picture-in-picture (PIP) widget enables you to show a different input in a smaller floating window you can position anywhere on the screen. The floating window appears on top of open apps, allowing you to continue viewing the second input while interacting with other apps or websites.
To use the PIP widget
Tap the PIP icon
 .
.The PIP widget opens:
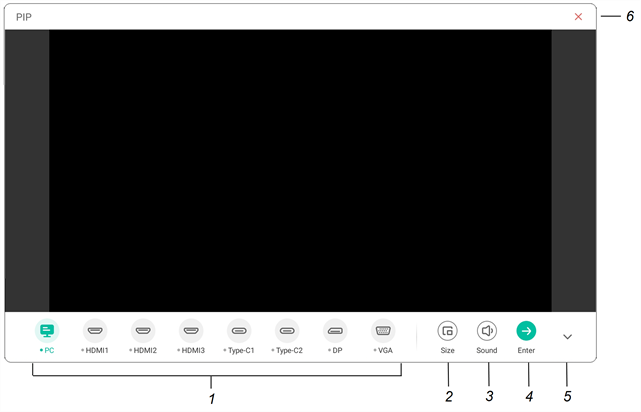
No.
Tool
1
Select an input.
2
Choose a size for the floating window (small, medium, or large).
3
Increase, decrease, or mute the input volume. 4
Display the input in full screen.
5
Hide the menu items.
6
Close the PIP widget.
Tap an input to appear in the second window.
Tap the Enter icon
 to view the selected input in full screen.
Note
If the selected input also has a USB cable connected for touch, you can control this input via touch, directly within the PIP window.
To close the PIP widget
Tap the Close icon
 .
.
The Split screen widget divides the screen into two parts, allowing you to use two different apps simultaneously. Display two documents or images side-by-side, or play a video on one half of the screen while taking notes on the other half.
Note
The Split screen widget doesn’t support simultaneous digital ink in the two apps.
To use the Split screen widget
Tap the Split screen icon
 .
.A list of apps that support the Split screen feature appears.
Select an app.
The selected app opens on one half of the screen.
Select a second app.
The second app opens beside the first open app.
To close the Split screen widget
Use the controls in the open apps to close each app.
Use the Screen lock feature to secure the display’s screen. When the Screen lock is enabled, a four digit passcode must be entered to unlock the screen.
Notes
Creation of a Screen lock passcode is part of the display’s initial set up. You can also configure the Screen lock feature in display settings.
Go to Display settings
System
Password
Lock-screen password
You can also enable a lock screen that appears when the display wakes from ready mode.
Go to Display settings
System
Lock-control
Wake lock
To lock the screen
- Tap the Screen lock icon
 .
. A passcode must now be entered to unlock the screen.
Open an on-screen calculator that appears on top of applications running on the display.
To use the Calculator widget
- Tap the Calculator icon
 .
. To close the Calculator widget, tap the Close icon
 .
.
The Screen Capture toolbar enables you to take a screen capture of a rectangular area or the entire screen.
To use the Screen Capture tool
Tap the Screen Capture icon
 .
.The Screen Capture tool opens:
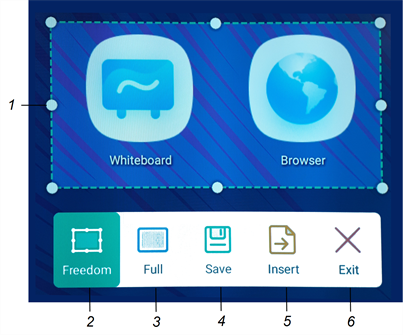
No.
Tool
1
Capture window resize handles.
2
Select a resizable rectangular window.
3
Select the entire screen.
4
Save the selected window or screen.
5
Insert the selected window or screen into a new whiteboard.
6
Close the Screen Capture widget
Select the area or screen you want to capture.
Tap the Save icon
 to save the selected window or screen.
The captured image is saved on the display to the default folder.
Tap Finish to continue working on the display, or Open to see the save image in the destination folder.
If you’ve opened the destination folder, you can move or copy the file to a USB drive or uploaded to your Google Drive or OneDrive account (see Moving or copying files).
OR
Tap the Insert icon
 to insert the selected window or screen into a new whiteboard.
To close the Screen Capture widget
Tap the Close icon
 .
.