Learn the interface

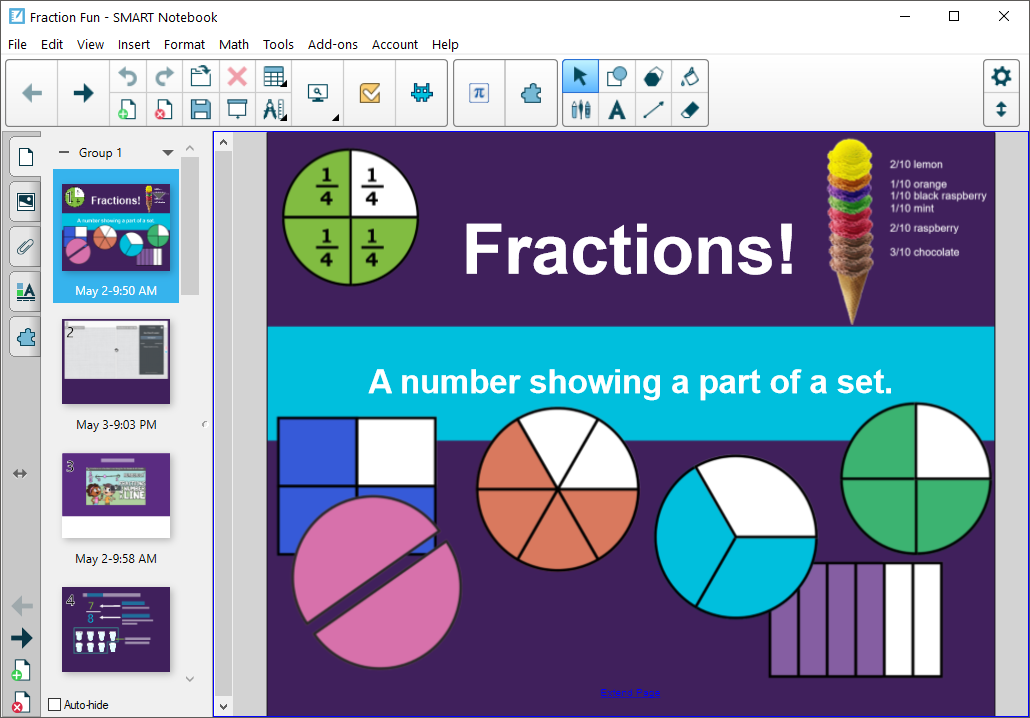
The SMART Notebook software interface consists of the these components:
Menu
Toolbar
Tabs (Page Sorter, Gallery, and so on)
Page area
The menu contains the commands for managing files, objects, and your SMART Account.

From the toolbar, you can select and use a variety of commands. The toolbar buttons are organized in panels.
Panel | Description |
|---|---|
Actions | The Actions panel includes buttons for browsing and making changes to .notebook files:  |
Add-ons | If you install SMART Notebook add-ons, an add-on panel appears to the right of the Actions panel:  |
Tools | The Tools panel includes buttons for creating and working with basic objects on pages:  |
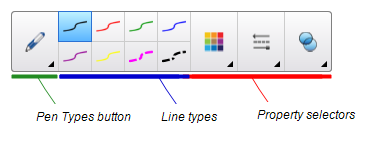
Contextual | When you select a button in the Tools panel, additional buttons appear. For example, if you select Pens
Select the Pen Types button to choose a pen type and then select one of the line type buttons to write or draw digital ink in that line type. You can customize a selected line type using the options in the Properties tab and then save your customizations for future use. Use the three property selectors beside the line type buttons to set the color, thickness, style and transparency of digital ink. If you click other buttons in the Tools panel, similar sets of additional buttons appear. |
Note
Many of these options are also available in Notebook’s menu.
You can add, remove, and change the position of buttons on the toolbar by tapping Customize the toolbar  .
.
By default, the toolbar appears at the top of the SMART Notebook software window. You can move it to the bottom by tapping Move toolbar to top/bottom of window  . This is useful in situations where you or your students can’t reach the toolbar when it’s at the top of the window.
The Page Sorter displays all the pages in the open file as thumbnails and automatically updates these thumbnails as you change the contents of the pages.
Using the Page Sorter, you can:
To learn more about how to use the Page Sorter to add, manage, and edit lesson pages, see Working with pages.
Use the Gallery tab in the SMART Notebook software user interface to browse or search for lesson activities and content to add to your lessons. Some of the content you can find in the Gallery tab includes:
Interactive media
Images
3D models
Activities
Online resources
You can also upload your own and other teachers’ content to the Gallery tab for use in your lessons.
To learn more about how to use the Gallery tab to add content to your lesson pages, see Inserting content from the Gallery.
The Attachments tab displays the files and web pages attached to the current file.
For more information about attachments, see Using attachments.
The Properties tab enables you to format objects on a page, including digital ink, shapes, lines, text and tables. Depending on the object you select, you can change:
The color, thickness and style of lines
The transparency and fill effects of objects
The font type, size and style of text
The animation of objects
The Properties tab displays only the options available for the object you select. For more information about displaying and setting object properties in the Properties tab, see Editing object properties.
The Add-ons tab enables you to work with SMART Notebook software add-ons.
For more information about SMART Notebook’s add-ons, see Managing and using add-ons.
The page area displays the contents of a selected page in a file. This is the area of the page where you create and work with objects.
The SMART Notebook software toolbar enables you to select and use a variety of commands and tools. You can customize the toolbar so that it includes the tools you use most frequently.
After adding or removing toolbar buttons, you can restore the default set of toolbar buttons. You can also restore the tools’ default settings if you customized and saved the settings using the Properties tab.
To add or remove toolbar buttons
Click Customize the toolbar
 .
.OR
Right-click the toolbar.
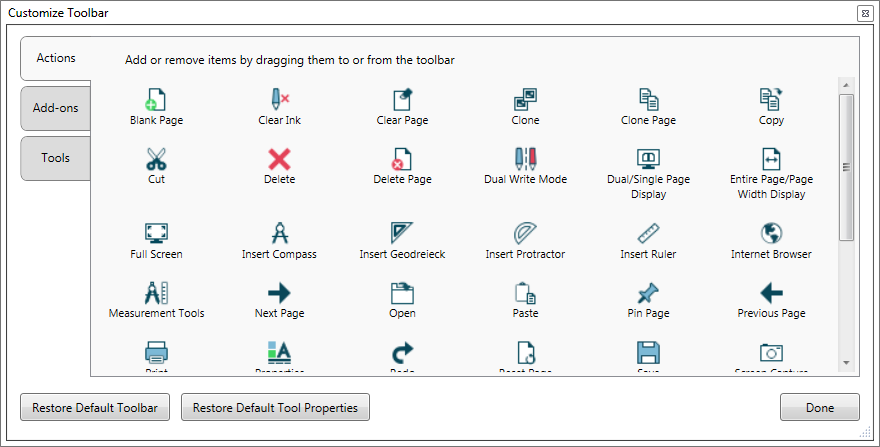
The Customize Toolbar dialog box appears.

Click Actions or Tools.
Do the following:
To add a button to the toolbar, click its icon in the dialog box, and then drag it to the toolbar.
To remove a button from the toolbar, click its icon in the toolbar, and then drag it away from the toolbar.
To rearrange the buttons, click an icon in the toolbar, and then drag it to a new position in the toolbar.
Notes
You can only add, remove and rearrange buttons in the panel of the toolbar you selected in step 2. For example, if you clicked Actions in step 2, you can only add, remove and rearrange buttons in the Actions panel.
To span a button across rows, drag and hold it between two columns of buttons.
If you’re using a smaller screen resolution, only span one or two buttons across rows to prevent issues when the toolbar is wider than the SMART Notebook software window.
Click Done.
To restore the default set of toolbar buttons
Click Customize the toolbar
 .
.OR
Right-click the toolbar.
A dialog box appears.
Click Restore Default Toolbar.
To restore the tools’ default settings
Click Customize the toolbar
 .
.OR
Right-click the toolbar.
A dialog box appears.
Click Restore Default Tool Properties.
Keywords |
|
 , the following additional buttons appear: