Inserting content from the Gallery
The Gallery in the SMART Notebook software contains images, media files, activities, interactive techniques, and more to aid you in creating lesson activities.
When your system administrator installs SMART Notebook software, they can install the following additional items:
Gallery Essentials: A collection of thousands of pictures, multimedia objects and more, organized into subject-specific categories.
Lesson Activity Toolkit: A collection of customizable tools and templates that you can use to create professional-looking and interactive lessons. The toolkit helps you create engaging content like word games, quizzes and sorting activities.
The Gallery tab also gives you access to other online content you can use with SMART Notebook such as SMART Exchange, Trimble 3D warehouse, and activities. Additionally, you can upload your own content to the Gallery and even export Gallery content to share with other teachers.
To open the Gallery tab, select Gallery  .
.
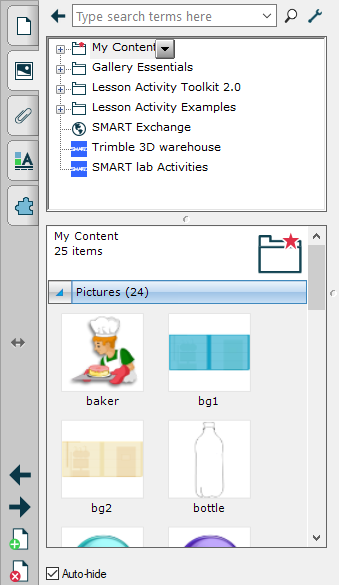
The Gallery is divided into two sections. The top section of the Gallery is the category list. When you select a category or subcategory in the list, its contents appear in the bottom section of the Gallery.
Tip
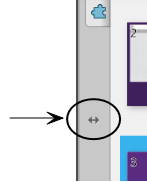
You can change the size of the category list and content list by dragging the boundary between them up or down.
To move the tab
Tap Move Sidebar to move the tab from one side of the window to the other.
Note
This moves all the tabs along with the tab you have open.
To resize or hide the tab
You can resize the tab by dragging its border left or right., or hide the tab when you aren’t using it by tapping the Auto-hide option.

To display the tab when it’s hidden, tap the tab’s icon.
Note
For Windows operating systems: if you reduce the tab to its minimum size, the auto-hide option turns on automatically.
You can browse the selected category to view its contents:
Pictures: pictures appear as thumbnails.
Interactive and Multimedia: video objects appear as a single frame from the videos, sound objects appear with a speaker icon in the lower-left corner.
3D Objects: 3D models appear as thumbnails.
Notebook Files and Pages: files appear as binders and pages appear with a folded upper-right corner.
Backgrounds and Themes: backgrounds appear as pages with a folded lower-right corner and themes appear as thumbnails.
After browsing or searching for a Gallery item, you can add it to your .notebook file.
You can search for a Gallery item using the keyword search.
To browse the Gallery
Tap a category’s plus sign to view its subcategories (for Windows operating systems) or tap a category’s disclosure triangle to view its subcategories (for OS X operating systems).
Note
You can close a category by tapping the category’s minus sign (Windows operating systems). For OS X operating systems. you can close a category by tapping the category’s disclosure triangle a second time.
Tap a category or subcategory to display its contents.
To search the Gallery
Type a keyword into the Type search terms here box.
Tap Search
 .
.The Gallery displays all content containing the keyword.
Important
Because Adobe is discontinuing Adobe Flash Player, SMART Notebook 21 does not support Adobe Flash content. You will see a notification about this when you attempt to open Flash content in SMART Notebook 21 for both Windows and OS X operating systems.
Learn more about Adobe’s decision and find out how to convert your Flash content in SMART Notebook.
To add a Gallery item to your .notebook file
Browse or search for the Gallery item you want to add.
Double-click the Gallery item’s thumbnail.
If you add a background, it replaces the page’s existing background.
If you add a page from a .notebook file, SMART Notebook software inserts it before the current page.
If you add a .notebook file, SMART Notebook software inserts the file’s pages before the current page.
You can add SMART Notebook software objects and pages as well as supported files to the My Content category in the Gallery.
To add an object to the Gallery
On the lesson page, tap the object that you want to add to the Gallery.
Drag the object from the page to the Gallery’s My Content category or one of its subcategories.
Notes
You’re unable to drag an object if it’s locked in place.
If you want to change a Gallery item’s name, select the item, tap its menu arrow, and then select Rename.
To add a page to the Gallery
Create and modify objects on the page until the page appears exactly as you want it to.
Tap File > Export Page as Gallery Item The Save Page as Gallery Item dialog box appears.
Browse to the folder where you want to save the page.
Type a name for the page in the File name box (Windows operating systems) or in the Save As box (OS X operating systems).
Tap Save.
If the Gallery isn’t visible, tap Gallery
.Tap My Content (or one of its subcategories) in the Gallery’s category list, tap its menu arrow, and then select Add to My Content.
The Add to My Content dialog box appears (Windows operating systems) or the Open dialog box appears (OS X operating systems).
Browse to and select the item that you saved in step 5.
Tap Open.
To add a supported file to the Gallery
Tap My Content (or one of its subcategories) in the Gallery’s category list, tap its menu arrow, and then select Add to My Content.
The Add to My Content dialog box appears (Windows operating systems) or the Open dialog box appears (OS X operating systems).
Browse to and select the item you want to add to the Gallery.
Tap Open.
Note
By default, SMART Notebook software names the new Gallery item based on the original file name. If you want to change the item’s name, select the Gallery item’s thumbnail, tap its menu arrow, and then select Rename.
As you add objects, pages and supported files to the My Content category in the Gallery, you may want to reorganize the category’s structure. You can create subcategories and move Gallery items between subcategories.
To create a subcategory
Tap My Content (or one of its subcategories) in the Gallery’s category list, tap its menu arrow, and then select New Folder.
A new subcategory appears.
Type a name for the new subcategory, and then press ENTER (or RETURN).
To rename a subcategory
Tap My Content in the Gallery’s category list, and then browse to the subcategory that you want to rename.
Tap the subcategory, tap its menu arrow, and then select Rename.
Type a new name for the subcategory, and then press ENTER (or RETURN).
To move a Gallery item to a different subcategory
Browse to the category that contains the Gallery item you want to move.
The Gallery displays the contents of the category.
Drag the item to another subcategory.
Importing and exporting collection files is an ideal way to share custom categories with other teachers and to use categories that other teachers have created. You can use collection files to add items to the My Content category in the Gallery. After you import a collection file, all of its items appear in the Gallery as a new subcategory.
To import a collection file from another teacher
Tap My Content (or one of its subcategories) in the Gallery’s category list, tap its menu arrow, and then select Add to My Content.
The Add to My Content dialog box appears (Windows operating systems) or the Open dialog box appears (OS X operating systems).
Browse to the folder that contains the collection file you want to import.
Note
A collection file has a .gallery extension.
Tap the collection file, and then tap Open.
The collection appears as a new subcategory.
To export a collection file to share with other teachers
Tap the category that contains the items you want to save in a collection.
Note
SMART Notebook software exports the selected category but doesn’t export any of its subcategories. See Knowledge Base article 171128 for more information.
Tap the category’s menu arrow, and then select Export as Collection File.
The Save As dialog box appears (Windows operating systems) or The Save dialog box appears (OS X operating systems).
Browse to the folder where you want to save the collection file.
Type a name for the file in the File name box (Windows operating systems) or in the Save As box (OS X operating systems).
Tap Save.
Keywords |
|