Connecting power, cables and devices
Connect the board to power after you install it but before you turn it on for the first time and configure the SMART kapp iQ appliance. You can also connect cables for room computers, guest laptops or other input sources as well as for speakers and room control systems.
By installing cables in advance, you make use of connectors that might not be accessible after the board is wall-mounted. You can then run the cables across floors or behind walls as needed.
Warning
Ensure that any cables that cross the floor to the board are properly bundled and marked to avoid a trip hazard.

Connect the supplied power cable from the AC power inlet on the bottom of the board to a power outlet.
Note
Refer to the board’s specifications for power requirements and power consumption information (see About your board).

The SMART kapp iQ appliance requires a network connection for downloading software updates, and a number of the SMART kapp iQ appliance’s apps require a network connection as well. You can connect to a network using a Wi-Fi connection or the RJ45 jack on the SMART kapp iQ appliance (pictured). For more information about the SMART kapp iQ appliance’s network connection and configuration, see Connecting to a network.
Note
By default, the HDMI output extends the Windows desktop, and this can cause display problems in certain configurations. If you experience issues, set the HDMI out to a mirrored desktop rather than the default extended desktop. Right click, select Display settings, and set the secondary display to mirror the first.
Tip
You can connect peripherals, such as a keyboard or mouse, to the Intel Compute Card using the USB receptacles on the iQ appliance.
You can connect cables to the board so that users can connect and use room computers, guest laptops or other devices, such as Blu-ray disc players.
The SMART kapp iQ appliance has one set of computer connectors and the board has three additional sets of computer connectors.
Note
For the best experience, connect computers or other input sources to the SMART kapp iQ appliance rather than to the board.
Procedure | iQ appliance | Board |
|---|---|---|
How you connect cables for a computer or other input source |
|
|
How users view the computer or other input source on the board |
|
|
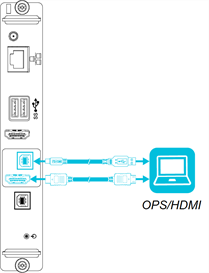
 on the front control panel until OPS/HDMI is selected.
SMART recommends the following varieties of cable:
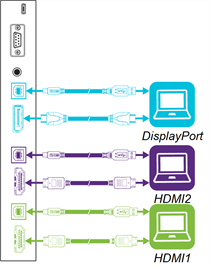
Cable type | Maximum length | Recommendations |
|---|---|---|
23' (7 m) 1 | Use only certified HDMI cables that have been tested to support the performance standard you require. | |
23' (7 m) | Use DisplayPort 1.2 compliant or better cables. | |
16' (5 m) | Use a USB extender if the distance between the computer and the board is greater than 16' (5 m). For more information, see USB extenders. |
Using cables that exceed these maximum lengths may produce unexpected results, degraded picture quality or degraded USB connectivity.
SMART software should be installed on any computers users connect to the display. For information on installing SMART software and viewing a connected computer’s input on the display, see Connecting and using computers.
The board includes two 10 W speakers, which are designed to provide sound at the front of a room. You might want to connect the SBA-100 projection audio system (see Accessories) or third-party external active speakers if you’re providing sound in a larger space.

You can connect external speakers to the board using the stereo 3.5 mm out connector (pictured). Alternatively, you can connect external speakers directly to a room computer.
A room control system enables users to control a room’s lighting, audio system and, possibly, the board. Some installations may require you to integrate the board with a room control system.
You can use the board’s RS-232 connector to connect a third-party external control system to the board (see Remotely managing your board).
Note
Boards are not compatible with centralized remote control systems, such as a universal remote control.
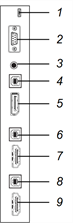
The following diagram and table present the connectors on the board’s connector panel:
SMART kapp iQ 55 and 65 |
SMART kapp iQ 65‑V2 and 75 |
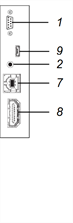
The following diagram and table present the connectors on the SMART kapp iQ appliance:
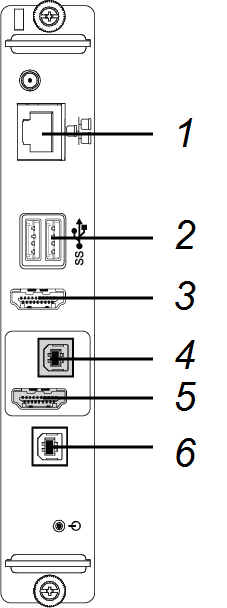
No. | Connector | Connects to | Notes |
|---|---|---|---|
1 | RJ45 | Network | See Connecting to a network and Ethernet (network) cables and connectors. |
2 | USB Type-A (×2) | Supported peripherals | [N/A] |
3 | HDMI out | External monitor | This connector is HDCP-encrypted HDMI. |
4 | USB Type-B | OPS/HDMI input (touch) | See Connecting cables for room computers, guest laptops and other input sources and USB cables and connectors. |
5 | HDMI in | OPS/HDMI input (video and audio) | See Connecting cables for room computers, guest laptops and other input sources and HDMI cables and connectors. |
6 | USB Type-B | [N/A] | This connector is a service port. |
7 | Micro SD | [N/A] | This connector is a service port. |
8 | LED | [N/A] | LED lights green when the SMART kapp iQ appliance is inserted in the accessory slot and turned on. |
Note
Older models of the SMART kapp iQ appliance don’t have all the connectors.