Setting up and playing a Label Reveal activity
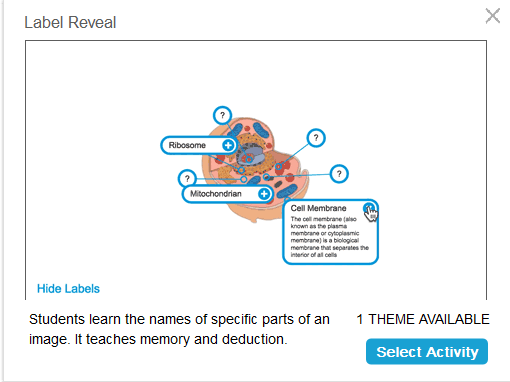
Have students click to reveal the labels on specific parts of an image. This activity teaches students to identify all the parts of the whole using memory and deduction and helps you test knowledge and lesson plan progression.
Have individual students participate with peer support as the activity progresses, or use small teams so team members support each other to find answers.
Here is an example of a label reveal activity about cell structure.

This example was created by uploading an image of a cell and clicking the various parts of the cell to add labels and notes.
Follow these instructions to create your own version of this activity. When you’re done, tap Preview to see how the activity will appear to students.
Click
 New to start creating a new lesson file.
OR
Add the activity to an existing lesson by opening the lesson in Editing mode. Browse to the page that you want the activity to follow and click Add
 .
.Select Game Based Activities.
The Game Based Activity Templates window opens.
Select Label Reveal.
The activity’s editor opens.
Drag an image into the square box in the activity editor.
OR
Click
 to browse to and select an image saved on your computer.
Click within the image to add a label.
The label and Label edit tool
 open.
open.Move the label to the part of the image you want to label.
Tip
Click
 below the image to reveal options for changing the shape and color of the label arrows.
Enter a brief description as the label text. To add an extended note of up to 150 characters, click the down arrow below the label text.
Click Done to close the Note window.
Add up to 10 labels, and then click Finish.
The activity loads and then appears on a new lesson page.
Open the lesson that contains the activity in Delivery mode, and then navigate to the page with the activity, and tap Start.
Tip
If you’re delivering this activity at the classroom display, you can add a buzzer, timer, or randomizer game element to facilitate group play. Tap
 to open the game element selector.
Ask students to identify and reveal component labels as they are discussed.
Each label appears as a question mark icon
 until it is tapped. Tapping the icon reveals the label
  .
.Tip
Select Hide Labels if you’d prefer to have students guess which elements are labeled by clicking parts of the picture.
If you’ve decided to use game elements, such as timers or buzzers, have two or three small student groups come to the SMART Board and identify the parts of the diagram. After each identification is made, students can tap the buzzer to indicate they’ve made their choice, and they can see how much time their identifications took. Students will enjoy trying to out-do each other to complete the activity quickly.
As an alternative, you can have individual students come to the SMART Board to reveal labels, and you can get the whole class to assist by calling out clues if the student needs help.
Tip
If you’d like to play again, use Reset
 to erase the activity data and start over.