Using the cordless pen
You can use the battery free cordless pen to write notes and draw on the display’s screen in digital ink and activate settings you assign to the pen’s rocker button.
Hold the cordless pen as you would hold any normal pen or pencil. As you work with the interactive pen display, you can rest your hand on the display screen, just as if it were a sheet of paper. You can tilt the cordless pen in any way that feels most comfortable for writing or drawing.
Important
You can write notes over applications and your desktop only if SMART Product Drivers is running on your computer. If the SMART Board icon in the Windows notification area or Mac Dock has a small red x in the lower right corner  or
or  , SMART Product Drivers is not running on your computer or the display is not connected properly.
Tips
You can access SMART Settings to assign actions to your pen buttons, such as opening SMART Notebook software or advancing the slide in a Microsoft PowerPoint presentation.
Store the cordless pen in the pen holder when it’s not in use. You can attach the pen holder to either side of the display.
You can use SMART Notebook software or SMART Meeting Pro software to make your presentations interactive and dynamic. For more details on about you can accomplish with SMART Notebook software or SMART Meeting Pro software, see the SMART software’s online Help.
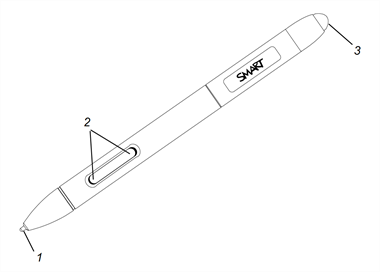
This illustration shows the cordless pen’s components.
No. | Component | Description |
|---|---|---|
1 | Pen nib | Press a Pen Color button, and then touch the pen nib to the screen surface to write with digital ink. Caution Replace a cordless pen nib when the nib wears down. If a pen nib wears down too far, you might scratch or damage the interactive pen display surface. Extra nibs are supplied with the interactive pen display. Tip Press the pen nib to the screen firmly to make digital ink appear. |
2 | Buttons | Use the two buttons as a custom shortcut to a variety of actions. |
3 | Eraser | Turn the pen around and move the eraser over the area you want to erase, just as you would use the eraser on a pencil. |
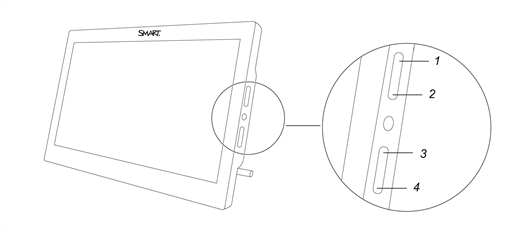
This illustration shows the pen color buttons on the side of the interactive pen display.
No. | Button | Press this button to: |
|---|---|---|
1 | Black ink | Write in black ink. |
2 | Red ink | Write in red ink. |
3 | Blue ink | Write in blue ink. |
Use SMART Settings to assign and change actions to the buttons on the cordless pen. The assigned action is performed when you press the button on the pen.
Note
The cordless pen must be quite close to the Podium to ensure assigned actions work correctly.
This table lists the actions you can assign to the buttons on the cordless pen.
Note
The pen actions Next Page and Previous Page are available only for use with SMART Notebook software and not for PowerPoint or other presentation software.
Action | Description |
|---|---|
| Print page | Prints the page currently displayed on the screen |
| Next page | Moves to the next page in a file |
| Previous page | Moves to the previous page in a file |
| Clear screen | Clears all digital ink and unlocked objects from a page |
| Right-click | Performs a right-click or control-click on the screen |
| Middle-click | Performs a middle-click |
| Double-click | Performs a double-click Tip For easier double-clicking, assign this setting to a component, such as a pen button, instead of tapping twice with the pen nib. |
Floating mouse | Moves the mouse cursor to the pen’s tip location without clicking (for example, to "hover" over an item on-screen to reveal a Tool Tip). |
SMART keyboard | Launches the SMART on-screen keyboard |
SMART Notebook software | Launches SMART Notebook software Note This option is only available when SMART Notebook software is installed on the connected computer. |
Screen capture toolbar | Opens the screen capture toolbar |
Eraser | The pen nib becomes an eraser until the assigned button is released Tip You can also access SMART Hardware Settings to customize the eraser thickness. |
Pen | Switches the cordless pen to operate in a customized mode until the assigned button is released. Tip You can also access SMART Hardware Settings to customize the cordless pen’s line style, fill effects and object transparency. |
Disabled | No action is assigned to the button |
Use the following procedure to access SMART Hardware Settings and assign actions to the cordless pen’s buttons.
To assign button actions on the cordless pen
Click the SMART software icon
 in the notification area (Windows computers) or the Dock (Mac computers), and then select Control Panel.
OR
Press the SMART Meeting Pro icon
 in the notification area, and then select Control Panel.
SMART Settings appears.
Click SMART Hardware Settings.
Select Pen and Button settings from the drop-down list.
From the on-screen options, select the button you want to customize.
Select an action for the button.
Click APPLY to save your settings.
Click OK to close SMART Settings.