Components
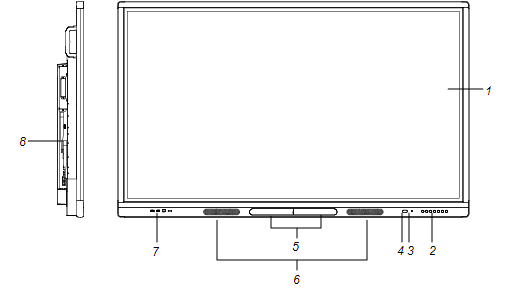
The display consists of the following components:
No. | Name | More information |
|---|---|---|
Pictured | ||
1 | Screen | |
| 2 | Front control panel | |
3 | Light sensor | |
4 | Remote control sensor / status light | |
| 5 | Pen (×2) | |
| 6 | Speakers | |
| 7 | Front connector panel | |
| 8 | Side connector panel | |
Not pictured | ||
9 | AC switch | |
10 | Bottom connector panel | |
11 | Remote control | |
The following are the dimensions for the display:
Model | Diagonal | Active touch area | Active image area |
|---|---|---|---|
SBID-MX165 | 64 1/2" (163.9 cm) | 57 3/8" × 32 3/4" (145.7 cm × 83.3 cm) | 56 1/4" × 31 5/8" (142.9 cm × 80.4 cm) |
SBID-MX175 | 74 1/2" (189.3 cm) | 66 1/2" × 38" (168.8 cm × 96.6 cm) | 65" × 36 1/2" (165 cm × 92.8 cm) |
SBID-MX186 | 85 5/8" (190.5 cm) | 76 3/8" × 43 3/4" (194.1 cm × 111.2 cm) | 74 5/8" × 42" (189.5 cm × 106.6 cm) |
The display comes with two pens.
The display’s bottom frame includes magnetic holders for the pens. Remove a pen from its holder and use the pen to draw digital ink.
Caution
When you return a pen to the magnetic holder, make sure it’s centered in its holder to keep it from falling and being damaged.
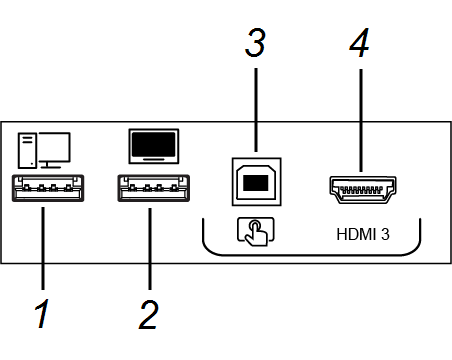
The front connector panel includes connectors for USB peripherals and a computer or other input source.
No. | Name | Procedure |
|---|---|---|
1 | USB 2.0 Type-A connector | Connect USB drives and other devices that you want to use with the currently selected input source. |
2 | USB 2.0 Type-A connector | Connect a USB drive and other devices that you want to use with the e³ experience. |
3 | USB 2.0 Type-B connector | Connect a USB cable to the display and computer to provide touch control of the computer connected to HDMI 3. |
4 | HDMI 3 input connector | Connect a computer or other input source to the display (see Using Input). |
The front control panel contains the Power, Input Select, Menu, Freeze, Mute and volume control buttons.
For more information about the front control panel, see Using the front control panel.
The remote control is an alternative to the front control panel for controlling the display.
For more information about the remote control, see Using the remote control.
The status light blinks green and red when it registers a button being pressed on the remote control.
When the status light is red, the display is in a low power state. To wake the display, press the Power button on the front control panel or POWER on the remote control.
The ambient light sensor can detect the room brightness and adjust the display’s brightness. Make sure Auto is enabled in Brightness and volume in Settings. See Brightness and volume.
The display includes two 10 W rms integrated speakers. You can also connect external speakers (see Connecting external speakers).