Managing workflows
|
|
|
|
|
|
|
|


A workflow allows you to run a series of commands on one or more devices in a single step. Workflows are particularly useful when you need to run commands in sequence.
Example
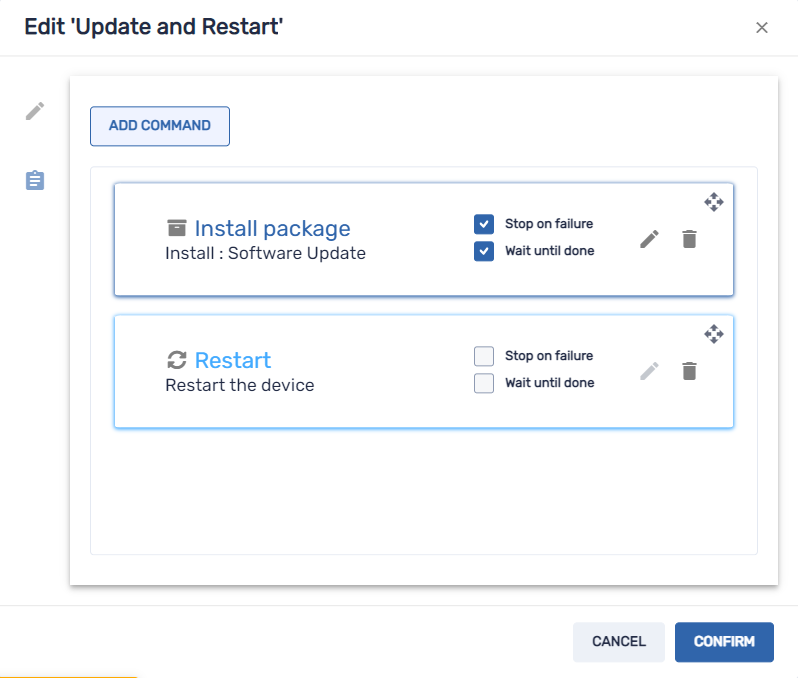
If you need to update software on devices then restart the devices to complete the installation, you can create a workflow that first deploys the appropriate software installation package then restarts the devices.
You can then run the workflow on appropriate devices enrolled in SMART Remote Management.
You can run a workflow on a single device, multiple devices, all devices that match a saved filter’s criteria, or a group. Alternatively, you can use a trigger to initiate a workflow at a scheduled time or when a specific event takes place.
To create a workflow
Click Repositories
 and select Workflow.
The Workflow window appears.
Tip
If your organization created its domain account after May 2023, the Workflow window includes sample workflows that you can use as starting point for creating your own workflows. These sample workflows have turquoise icons.
Click Add New.
Type a name and description for the workflow in the Workflow name and Workflow description boxes.
Click Commands
.Click Add command and select from the following options:
Option
Subsequent steps
Advanced messaging
Select an advanced message.
Click Add.
Clear apps data
Click Add to list
 for each app for which you want to clear data.
Click Confirm.
Device alert
For each email address to which you want to send the alert, type the email address in the Add email, then press Enter box and press ENTER.
Tips
Your SMART Remote Management user account’s email address is included by default.
You can delete an email address by clicking its
 button.
Type the alert message in the Message box.
Click Confirm.
Device settings
Select settings.
Click Add.
Disable apps
Click Add to list
for each app you want to disable.Click Confirm.
Enable apps
Click Add to list
for each app you want to enable.Click Confirm.
Install package
Select an installation package.
Click Add.
Remote execute
Select a remote execution command.
Click Add.
Remove Google accounts from device
Select Remove all accounts to remove all Google accounts.
OR
Select Keep one account to retain one Google account and type that account’s email address in the Email account box.
Click Confirm.
Restart
N/A
Send files
Select files.
Click Add.
Send message
Type the message title and body text in the Message Title and Message Body boxes.
Click Confirm.
Shutdown
N/A
Sound siren
N/A
Time out
Type the time in minutes and seconds before devices should time out.
Click Confirm.
Uninstall packages
Click Add To List
for each app you want to uninstall.Click Uninstall Selected.
Wake on lan
To wake the target devices that match a filter’s or group’s criteria, select Filter or Group and select a filter or group from the drop-down list.
SeeFinding devices
OR
To wake a single target device, select Device and type a target device’s ID in the Device ID box.
OptionalTurn on Advanced wake-on-lan settings and specify the broadcast address and port for execution if your network requires this information.
Click Confirm.
For each command you added in step 4:
Select Stop on failure to stop the workflow if the command fails.
Select Wait until done to allow the command to finish running before the workflow continues to the next command.
Tip
To move a command higher or lower in the order of execution, click Press to drag
 and drag the command up or down.
Click Confirm.
To run a workflow on a single device
Click Devices
 to open the Devices view.
OptionalFilter the devices shown in the Devices view.
SeeFinding devices
Click the device’s row.
The device’s dashboard window appears.
Click Repository actions, and then click Workflow.
The Workflow window appears.
Select the workflow from the list and click Apply.
To run a workflow on multiple devices
Click Devices
to open the Devices view.OptionalFilter the devices shown in the Devices view.
SeeFinding devices
Select the devices’ check boxes.
Click Workflow
 .
.The Workflow window appears.
Select the workflow from the list and click Apply.
To run a workflow on all devices that match a saved filter’s criteria
Click Devices
to open the Devices view.Click Filters
 in the Search bar.
Click Actions
 in the saved filter’s row and select Workflow.
The Workflow window appears.
Select the workflow from the list and click Apply
To run a workflow on a group
Click Devices
to open the Devices view.Click Groups to open the Groups panel.
Click Actions
in the group’s row and select Workflow.The Workflow window appears.
Select the workflow from the list and click Apply
Tip
To run the workflow on any new devices added to the group, see Making group commands persistent.