Using the display’s
To open the Widgets menu, open the side Toolbar and tap the More icon .
.
SeeSide Toolbar
You can also pin the you use regularly to the side Toolbar.
Note
Widgets always appear on top of other open windows, programs, and connected devices.
The Widgets menu features the following tools and controls:
Icon | Widgets | Function | For more information |
|---|---|---|---|
 | Settings | Access to display’s settings. | |
 | Input | Select an input and adjust brightness and volume. You can also access advanced options for configuring input settings. | |
| Overlay | Write on an overlay on top of any app, video, website, document, or image, including input from a connected computer. Saving to cloud storage is also supported. | |
 | Timer | Start a countdown timer. | |
 | Stopwatch | Start a stopwatch that counts up from zero for measuring elapsed time. | SeeUsing Stopwatch |
 | Spotlight | Use the Spotlight during a presentation to draw attention to an area of a screen. | |
 | Record | Use the Record to record your actions on the display. | |
 | Freeze | Freeze and zoom the current image on the screen. | |
 | PIP | Use the picture-in-picture (PIP) widget to show a different input in a smaller floating window while using other apps on the display. | |
 | Lock Screen | Lock the screen. | |
 | Calculator | Open an on-screen calculator. | |
| Screen Capture | Capture screen captures of anything on the screen, including content from apps, websites, and videos. Select Freedom, Full, and window mode. You can add captured screens to a whiteboard and edit them. | |
| Display center | Configure how the display’s screen will display when you connect to an external display. | |
| OPS | Switch to viewing the input from a SMART appliance installed in the display’s OPS slot. | |
| AirClass | The AirClass widget enables participants to respond to classroom quizzes and challenges by submitting responses using their mobile devices. |
Use the Overlay to write or draw over the currently displayed screen contents. After you finish, you can save the overlay to the Files library.
To write or draw on an overlay
Tap the Overlay icon
 .
.Use the display’s pens or your finger to write or draw in digital ink.
If you want to keep the overlay, tap the Save icon
 to save the image file to the display in .png format.
This is will also save a copy of the .png file locally.
When you’re done, tap the Close icon
 to exit the overlay.
To erase ink on an overlay
Erase ink by moving your fist or palm over the digital ink.
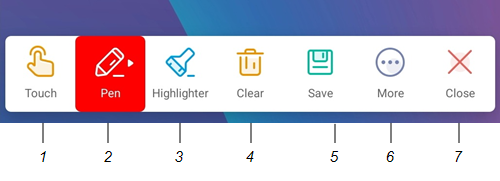
No. | Tools and controls |
|---|---|
1 | Select tool. When the Select tool is active, your touch passes through the overlay and interacts with the screen contents behind it. |
2 | Pen tool. When the Pen tool is active, your touch draws digital ink on the overlay. Options are available for pen size and color. |
3 | Highlighter tool. When the Highlighter tool is active, your touch draws transparent digital ink on the overlay. Options are available for pen size and color. |
4 | Erase all digital ink on the overlay. |
5 | Save the current overlay. |
6 | Open File manager, insert an image, and access cloud storage. |
7 | Remove the overlay and close the Overlay widget. |
Use the Timer to display a countdown timer on the screen.
To use the Timer tool
Tap the Timer icon
 .
.The Timer opens:
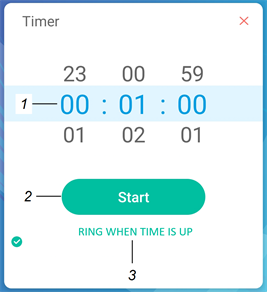
No.
Control
1
Timer display (left to right): hours, minutes, seconds. Slide your finger up or down on the numbers to customize the countdown timer.
2
Start the countdown timer.
3
(Optional) enable the RING WHEN TIME IS UP option to add an audible ring tone that sounds when the timer ends.
Tap Start to start the countdown timer.
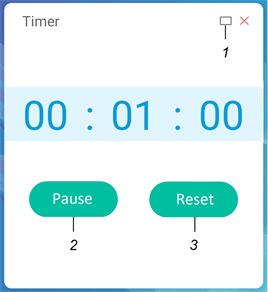
This image and table describe the options available after the timer has started:
No.
Control
1
Make the countdown timer full screen. Tap again to return to normal size.
Tap the screen anywhere other than the timer to make the timer a moveable floating window and move it around.
2
Pause the countdown timer.
3
Reset the countdown timer.
To close the Timer tool
Tap theClose icon
 .
.
Use the Stopwatch to count up from zero and measure elapsed time.
To use the Stopwatch tool
Tap the Stopwatch icon
 .
.The Stopwatch opens:
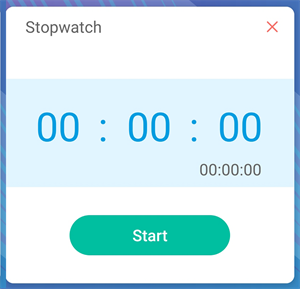
Tap Start to start the stopwatch.
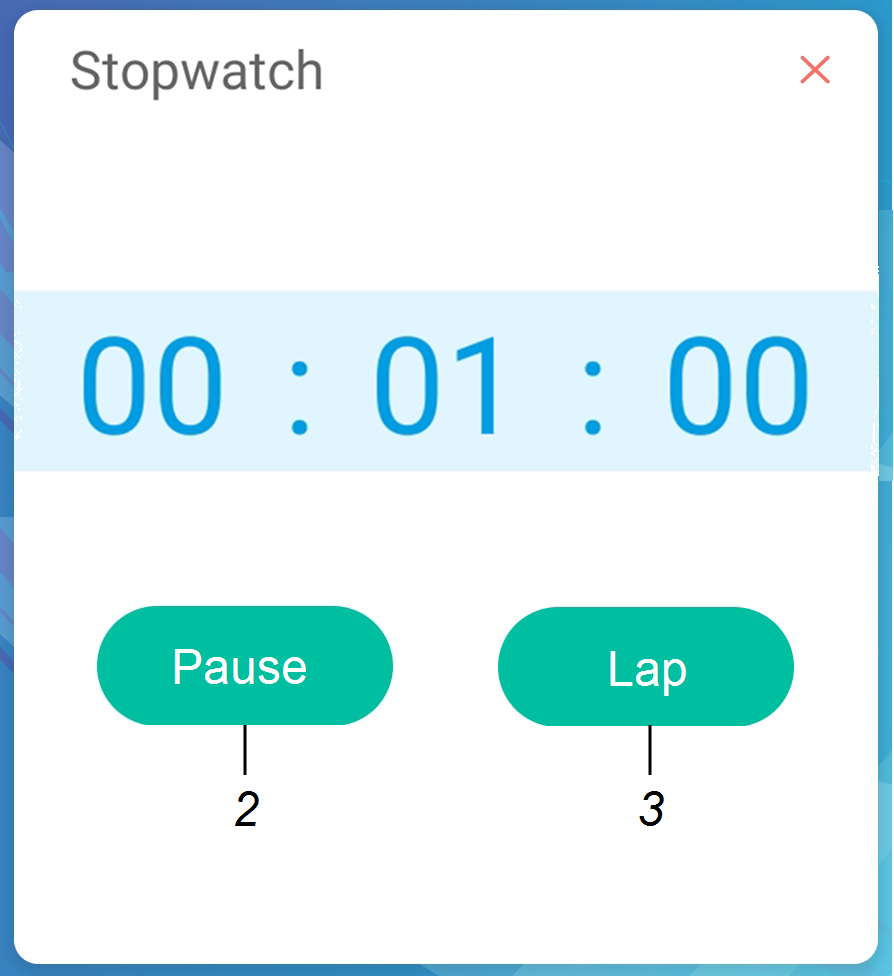
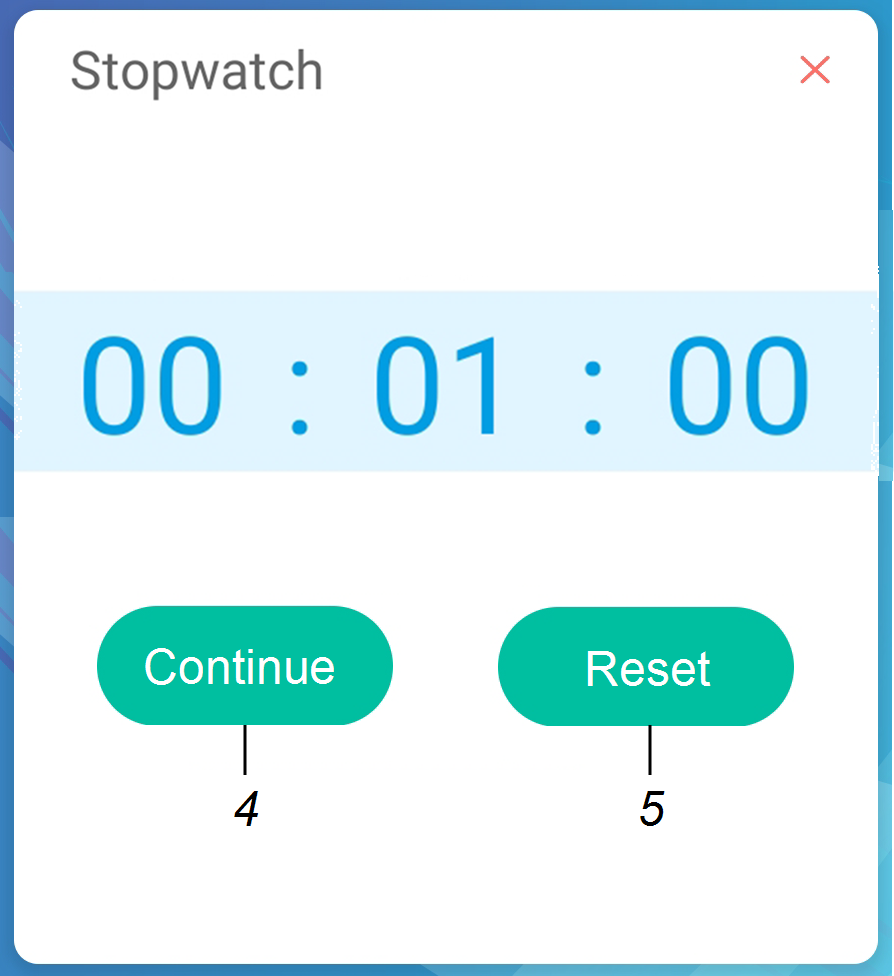
This image and table describe the options available after the stopwatch has started:
No.
Control
1
Pause the stopwatch.
2
Record the current time and display it in a list of other times you’ve recorded.
3
Resume the stopwatch after pausing.
4
Reset the stopwatch to zero.
Tip
You can turn the Stopwatch into a moveable floating menu by tapping a different part of the screen.
To close the Stopwatch
Tap the Close icon
 .
.
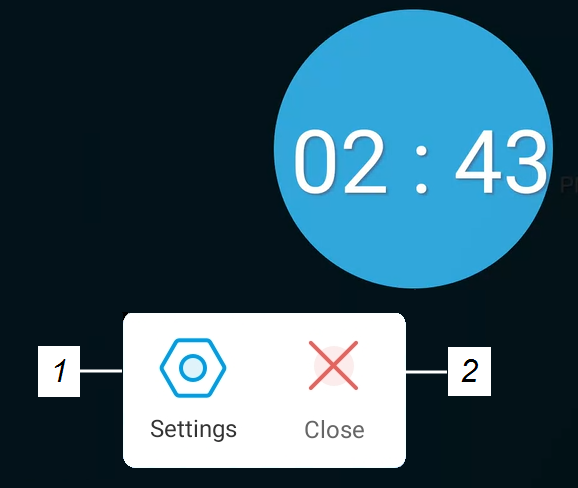
You can use the Spotlight during a presentation to draw attention to a particular screen area.
To use the Spotlight
Tap the Spotlight icon
 .
.The Spotlight is activated:
No.
Control
1
Open Settings for controls that change the spotlight’s size and transparency.
Tip
You can also use finger gestures to change the size of the spotlight area.
2
Close the Spotlight .
Press and drag the Spotlight window to highlight an area of the screen.
To close the Spotlight
Tap the Close icon
 .
.
You can use the Record to record a video of the on-screen activity.
To use the Record
Tap the Record icon
 .
.The Record opens:
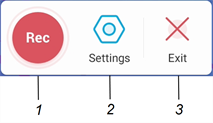
No.
Control
1
Begin recording.
2
Open Settings for controls that change the video’s resolution and to select a location for the saved recording.
3
Close the Record .
(Optional) Tap Settings and change the default resolution and the location of the saved recording.
Tap the Rec icon
 to begin recording your actions on the display.
If you want to pause the recording, tap the Pause icon
 .
.
To resume recording, press the Resume icon
 .
.To stop the recording, tap the Stop icon
 .
.The recording is saved to the display.
To close the Record
Tap the Exit icon
 .
.
You can use the Freeze to temporarily freeze the screen.
Note
Freezing the screen does not pause running applications on the connected computer. It simply freezes the display of those applications.
To use the Freeze
Tap the Freeze icon
 .
.The Freeze appears and the screen is temporarily frozen:
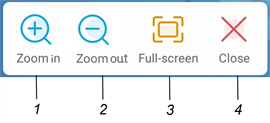
No.
Control
1
Zoom into the current screen.
Tip
You can also use pinch-to-zoom finger gestures to zoom in or out.
2
Zoom out from the current screen.
3
Return to the default screen size.
4
Close the Freeze .
Press and drag the frozen image to move it on the screen, and use the zoom controls to focus on a specific detail.
To close the Freeze
Tap the Close icon
 .
.
The picture-in-picture (PIP) enables you to show a different input in a smaller floating window you can position anywhere on the screen. The floating window appears on top of open apps, allowing you to continue viewing the second input while interacting with other apps or websites.
To use the PIP
Tap the PIP icon
 .
.The PIP opens:
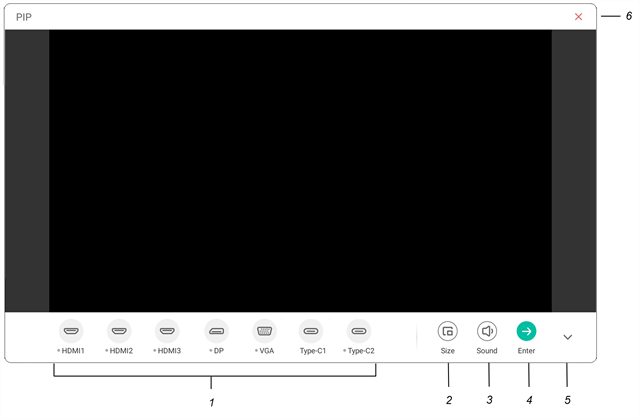
No.
Control
1
Select an input.
2
Choose a size for the floating window (small, medium, or large).
3
Increase, decrease, or mute the input volume. 4
Display the input in full screen.
5
Hide the menu items.
6
Close the PIP .
Tap an input to appear in the second window.
Tap the Enter icon
 to view the selected input in full screen.
Note
If the selected input also has a USB cable connected for touch, you can control this input via touch, directly within the PIP window.
To close the PIP
Tap the Close icon
 .
.
Use the Screen Lock feature to secure the display’s screen. When the screen lock is enabled, a pattern, PIN, or password. must be entered to unlock the screen.
Note
Creation of a screen lock is part of the display’s initial set up. You can also configure the Screen Lock feature in display settings.
To lock the screen
- Tap the Screen Lock icon
 .
. A pattern, PIN, or password must now be entered to unlock the screen.
Tip
If the screen lock isn’t configured, a message appears confirming no password is set. Tap Confirm to access options for configuring the screen lock.
Open an on-screen calculator that appears on top of applications running on the display.
To use the Calculator
- Tap the Calculator icon
 .
. To close the Calculator , tap the Close icon
 .
.
The Screen Capture toolbar enables you to take a screen capture of a rectangular area or the entire screen.
To use the Screen Capture
Tap the Screen Capture icon
 .
.The Screen Capture opens:
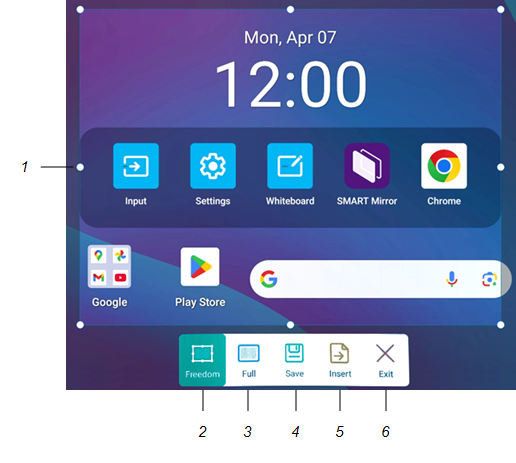
No.
Control
1
Capture window resize handles.
2
Select a resizable rectangular window.
3
Select the entire screen.
4
Save the selected window or screen.
5
Insert the selected window or screen into a new whiteboard.
6
Close the Screen Capture .
Select the area or screen you want to capture.
Tap the Save icon
 to save the selected window or screen.
The captured image is saved on the display to the default folder.
Tap Finish to continue working on the display, or Open to see the save image in the destination folder.
If you’ve opened the destination folder, you can move or copy the file to a USB drive or uploaded to your Google Drive or OneDrive account.
OR
Tap the Insert icon
 to insert the selected window or screen into a new whiteboard.
To close the Screen Capture
Tap the Close icon
 .
.
Use the Display center to configure how the display’s screen will display when you connect to an external display. This is useful when you’re using the display in an auditorium or other large space where it would be beneficial to have a second display.
To use the Display center
Connect the display to a secondary display.
Tap the Display Center icon
 .
.The Display Center opens:
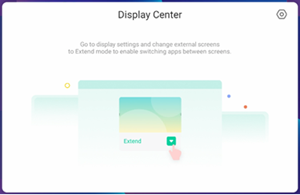
Tap the Display settings icon
 .
.These images and table describe the options available in Display settings:
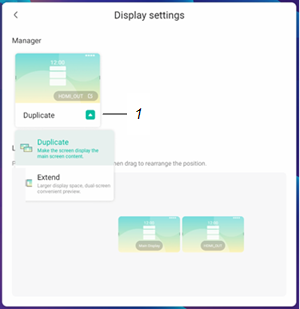
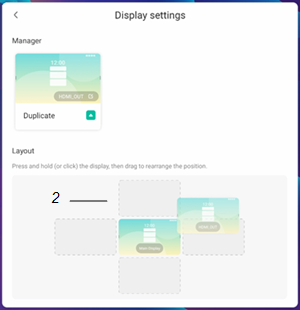
No.
Control
1
Open the drop-down menu and choose to duplicate or extend the appliance’s desktop to the external display.
2
Press and hold the display image and then drag it to a new position.
If a SMART OPS appliance is installed in the display's OPS slot, you can switch to its input and view and interact with it as well.
To view input from an OPS appliance
Install a SMART OPS appliance in the display's OPS accessory slot
SeeOPS appliances
Tap the OPS icon
 .
.The input from an installed OPS appliance appears on the display’s screen.
Use the AirClass widget to enable audience participation in lessons or activities that feature interactivity such as quizzes. Share your lesson material on the display or ask questions, participants can then respond using their mobile devices. Participants can respond to single or multiple choice questions, and also provide "True" or "False" responses to questions. Once a quiz or challenge is complete, view statics on the participants' answers. You can manage participant engagement in an activity by identifying the first respondent to a question. You can also select participants at random to answer a question or participate in an activity. Participants can also send messages that appear on the display's screen.
To use the AirClass
Tap the AirClass icon
 .
.A dialog box appears providing information on how participants can join an activity.
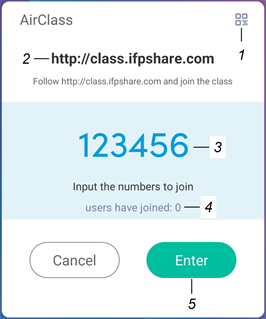
No.
Control
1
Open a QR code participants can scan to join an activity.
2
Participants can join an activity by going to http://class.ifpshare.com in a browser on their device.
3
The code participants enter to join an activity.
4
Number of participants who’ve joined an activity.
5
Press Enter to start an activity.
Direct participants to http://class.ifpshare.com and have them enter the activity code number and their names to connect to an activity.
OR
Tap the QR code symbol in the upper right-corner of the dialog box and direct participants to use their mobile devices to scan the QR code that appears. Participants are directed to a website where they can enter their names and join an activity.
Tap Enter to open the activity and view options for managing an activity.
The controls for managing an activity appear.

No.
Control
1
Share lesson material on the display such as a quiz. Choose whether participants can respond with single choice or multiple choice answers. View answer statics when voting is complete.
2
Start a drum role audio that plays until a participant confirms on their mobile device they’d like to answer a question.
3
Randomly select an individual (or individuals) from the list of participants to answer a question.
4
Enable participants to send text messages to the display that appear at the top of the display’s screen.
5
Enable more participants to join an activity by opening a dialog box providing information on how to join an activity.
6
Save a record of an activity details to the display.
7
Exit the AirClass .
To close the AirClass
Tap the Exit icon
 .
.