Configuring the web portal and activating the SMART TeamWorks 4 Server license
After you initialize the database, you need to connect the SMART TeamWorks 4 meeting server to the web portal and activate your organization’s license for SMART TeamWorks 4 Server. You’ll also need to enter settings for the meeting server and other global settings.
To activate the SMART TeamWorks 4 Server license
In a browser, go to your web portal (for example, https://webportal.smartteamworks.com).
Sign in using the Super Administrator credentials you created.
From the web portal’s navigation menu, click Settings to open the Site settings page.
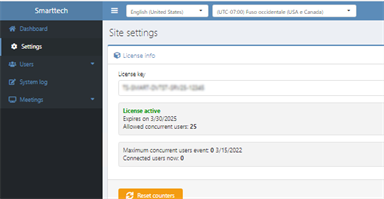
Expand the License info section. In the License key field, enter your organization’s license key for SMART TeamWorks 4 Server.
Click Save License.
Note
If you see the error message “Unable to contact on license server” make sure that server can access the Re Mago license server (*remago.com) on port 443. Also confirm that the firewall, antivirus, and proxy settings do not block this communication.
To add the Meeting Server URL for SMART TeamWorks 4 Server
From the web portal’s navigation menu, click Settings to open the Site settings page.
Expand the Meeting server list section and click Add Server.

Enter the URL for the SMART TeamWorks 4 meeting server site you created and click Add Server. See You will need this address later when you configure the web portal for the SMART TeamWorks 4 Server..
To select a storage type for SMART TeamWorks 4
From the web portal’s navigation menu, click Settings to open the Site settings page.
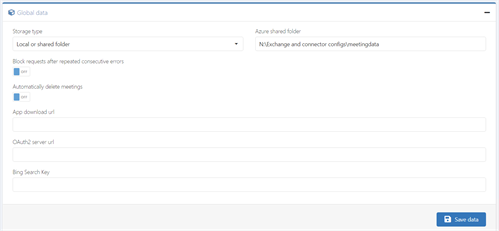
Expand the Global Data section.
Select the Storage Type your organization is using for SMART TeamWorks 4 Server.

Complete the storage settings setup using the procedure that applies to your selected storage type.
To configure storage settings with Azure File Storage
In the Azure shared folder field, enter the following settings:
Field
Description
Azure shared folder
Enter the name of the root folder in the Files page of the storage account created for the SMART TeamWorks 4 Server in your organization’s Azure Portal. If a folder doesn’t already exist, create one.
Azure storage connection string
Enter the connection string located in the Access keys page of the storage account created for the SMART TeamWorks 4 Server in your organization’s Azure Portal.
Important
Before entering these settings, you must have a storage account resource type created for the SMART TeamWorks 4 Server in your organization’s Azure Portal.
Click Save data.
To configure storage settings with a Local or Shared Folder
If you chose Local or Shared Folder as the storage type, create a folder for storing SMART TeamWorks 4 meeting data files. This folder should be on the same virtual machine server or computer where SMART TeamWorks Server was installed.
- In the Azure shared folder field, enter the pathway for the folder you created in step 1.
Click Save data.
To complete global settings for SMART TeamWorks 4 Server
From the web portal’s navigation menu, click Settings to open the Site settings page.
Expand the Global Data section.
Select the following options to suit your needs:
Option
Description
Accept only HTTPS connections
Select this option to enable only HTTPS connections for connecting to whiteboard sessions.
Block requests after repeated consecutive errors
Select this option to block multiple failed sign in attempts that originate from a potential attacker.
SMART recommends selecting this option for security purposes.
Automatically delete meetings
Select this option if you want meeting data to be removed after a set time.
Note
Choosing this option does not delete data for recurring meetings.
Start time
If you've enabled Automatically delete meetings, enter the start time.
Days from the end of the meeting
If you've enabled Automatically delete meetings, enter the time period (in days) after which the meeting data will be deleted.
(Optional) In the App download url field, enter https://support.smarttech.com/downloads/teamworks.
This redirects meeting participants to the SMART TeamWorks 4 apps download page if they click the join session link in the meeting invitation but do not yet have the SMART TeamWorks 4 app installed on their device.
In the Web Conference Url field, enter the URL for your organization’s web conference application.
Leave the Magocast Server Url field blank. This feature is not yet supported.
If your organization has a Bing search key, enter your organization’s key in the Bing Search Key field. This enables the web search feature in the SMART TeamWorks 4 whiteboard’s File Manager.
Click Save data.
Keywords |
|