Working with pages
A .notebook file is composed of a series of pages, each with its own objects and properties.
The Page Sorter displays all the pages in the open file as thumbnails and automatically updates these thumbnails as you change the contents of the pages.
Using the Page Sorter, you can:
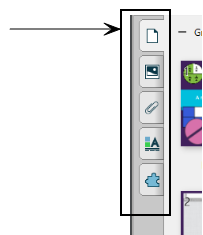
To open the Page Sorter, select Page Sorter .
.
To move the tab
Tap Move Sidebar to move the tab from one side of the window to the other.
Note
This moves all the tabs along with the tab you have open.
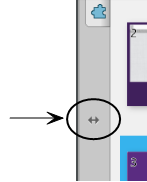
To resize or hide the tab
You can resize the tab by dragging its border left or right., or hide the tab when you aren’t using it by tapping the Auto-hide option.

To display the tab when it’s hidden, tap the tab’s icon.
Note
For Windows operating systems: if you reduce the tab to its minimum size, the auto-hide option turns on automatically.
You can display any page in the file using the Page Sorter. You can display the next or previous page in the file using buttons or gestures.
To display a page
If the Page Sorter isn’t visible, press Page Sorter
.Tap the thumbnail of the page you want to display.
To display the next page in a file
Tap Next Page
 .
.
To display the previous page in a file
Tap Previous Page
 .
.
You can add a blank page to the open file using the Add Page button or the Page Sorter.
To insert a page using the Add Page button
Tap Add Page
 .
.The new page appears after the current page.
To insert a page using the Page Sorter
If the Page Sorter isn’t visible, press Page Sorter
.Select the thumbnail of the page you want the new page to appear after.
Tap the thumbnail’s menu arrow, and then select Insert Blank Page.
The new page appears after the selected page.
From the Page Sorter, right-click on the page you want to cut or copy and select Cut Page or Copy Page. To paste a copied or cut page, right-click and select Paste.
As an alternative to creating a blank page, you can create a duplicate (or “clone”) of an existing page.
Note
You can clone a page only if it contains content.
To clone a page
If the Page Sorter isn’t visible, press Page Sorter
.Select the thumbnail of the page you want to clone.
Tap the thumbnail’s menu arrow, and then select Clone Page.
The cloned page appears immediately after the current page.
Note
You can repeat this process as many times as you want.
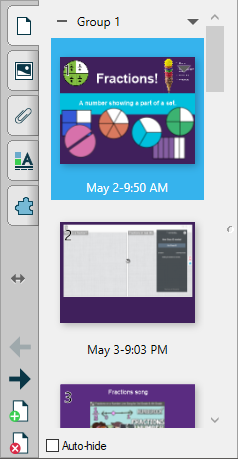
When you create a page, SMART Notebook software automatically names the page with the date and time of its creation. You can also rearrange and group pages.
To rename a page
If the Page Sorter isn’t visible, press Page Sorter
.Double-click the page’s name.
Type a new name for the page.
Tap elsewhere.
If the Page Sorter isn’t visible, press Page Sorter
.Tap the thumbnail of the page you want to move in the file.
A blue border appears around the thumbnail.
Drag the thumbnail to its new position in the Page Sorter.
A blue line indicates the page’s new position.
Release the thumbnail.
Windows operating systems only
If the Page Sorter isn’t visible, press Page Sorter
.By default, all the pages in a Notebook file are already part of a group titled Group 1. You can rename Group 1 by typing a new name.
To add a second group, press the first group’s menu arrow, and then select Add New Group.
A second group, with a new, blank page, appears below the first.
Type a name for the second group.
macOS operating system software only
Note
If you’re using SMART Notebook software on a Mac computer the procedure is slightly different. Instead of choosing Add New Group from the default group’s menu arrow, select Edit Page Groups. This action displays current groups in the page area, where you can create, rename, move, or delete them.
The next four procedures are also affected by this difference. On a Mac, you select the Edit Page Groups function to display groups in the page area for editing rather than editing them directly in the Page Sorter.
To move pages within or between groups (Windows)
Windows operating systems only
Drag a page’s thumbnail to a new position within the group or into a different group.
To move a group (Windows)
Windows operating systems only
Drag the group’s title bar to the group’s new position.
Notes
You can also rearrange groups by tapping a group’s menu arrow, and then tapping Move Up or Move Down.
SMART Notebook software numbers pages sequentially across a file. If you change the order of groups, SMART Notebook software renumbers the pages in the groups accordingly.
To delete a group and keep its pages (Windows)
Windows operating systems only
Move the pages in a group to different groups. When a group contains no pages, SMART Notebook software deletes it automatically.
To delete a group and all pages in the group (Windows)
Windows operating systems only
Tap the group’s menu arrow and select Delete Group.
You can delete a page from the current file using the Delete Page button or the Page Sorter.
Tip
As an alternative to deleting a page, you can clear all of its objects (see Clearing pages).
To delete a page using the Delete Page button
If you haven’t done so already, display the page you want to delete.
Select Delete Page
 .
.
To delete a page using the Page Sorter
If the Page Sorter isn’t visible, press Page Sorter
.Select the thumbnail of the page you want to delete.
Tap the thumbnail’s menu arrow, and then select Delete Page.
Keywords |
|
Related documents |