Tips and resources for troubleshooting
You can use these tips and resources when troubleshooting the interactive whiteboard.
If your projector isn’t installed in a fixed location, you can correct many image problems by shifting your projector or adjusting its zoom lens. Optimally, you should have a margin of approximately
Notes
Don’t adjust the image size and geometry based on your projector’s splash screen. The splash screen image is much smaller than the computer’s projected image. Before you adjust the projected image, make sure that you set the computer’s resolution and refresh rate. See Configuring your computer settings.
Complete the following steps only as required.
To adjust the projected image
If the left and right edges of the projected image aren’t parallel, raise or lower your projector at the front or back until the edges are parallel.
If the top and bottom edges aren’t parallel, turn the projector slowly until the edges are parallel.
Further adjust your projector using small, slow movements until you’re satisfied with the projected image.
Correct the image’s horizontal and vertical position by adjusting the height and position of the projector platform or stand.
Adjust the image laterally by sliding the projector to the left or right.
Adjust the image size by moving the projector forward or backward to increase or reduce the image size, until it correctly fills the screen.
Make fine adjustments to the image level and size according to your projector manufacturer’s instructions.
Create a clear image by adjusting your projector’s focus function.
If your interactive whiteboard behaves erratically or becomes unresponsive, possibly because of an electrostatic discharge, a power fade or interruption or some other event, you might be able to restore normal operation by resetting your interactive whiteboard.
Reset your interactive whiteboard by disconnecting and then reconnecting the USB cable, or by removing and replacing the power plug to the expansion module. This step turns the power off and back on, resetting all components of your product.
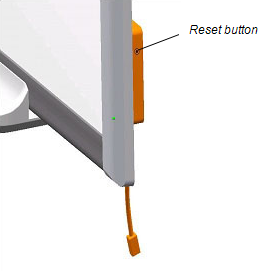
The Reset button on the side of your interactive whiteboard’s controller module lets you reset the controller. The Reset button is recessed so that it can’t be triggered accidentally. Use the tip of a pen tray pen or another pointed object, such as a ball-point pen, to press this button.
Press the Reset button if the controller module stops responding or is in the wrong mode. After you press the Reset button, the controller module resets and operates normally.
Note
Pressing and holding the Reset button for longer than three seconds clears any saved 4- or 9-point orientation data from the controller module’s memory, and the alignment defaults to factory settings. Because 12- and 20-point orientation data is stored on your computer, however, this data is retained after a reset.
SMART Settings includes a connection wizard for troubleshooting problems with the connection between the computer and interactive whiteboard.
For example, you may need to configure a serial port manually in the following situations:
The computer’s operating system doesn’t support plug and play.
The Found New Hardware wizard doesn’t appear.
You connected the interactive whiteboard to a power source after you started your computer.
The Ready light remains red after you start SMART Board Tools.
To troubleshoot connections
Click the SMART Board icon
 in the notification area (Windows) or menu bar (Mac) and select SMART Settings.
Note
If your computer isn’t currently connected to an interactive whiteboard, the SMART Board icon includes an X in the lower-right corner
 .
.Click Connection Wizard.
The SMART Connection Wizard appears.
Follow the on-screen instructions.
With SMART Diagnostics, you can troubleshoot a variety of camera problems and configure many of the camera settings for the interactive whiteboard.