Orienting your interactive whiteboard
Your SMART Board interactive whiteboard includes default orientation data. Your interactive whiteboard’s controller module uses this data if you haven’t oriented your interactive whiteboard with SMART Product Drivers.
After you install SMART Product Drivers on your computer, orient your interactive whiteboard. An orientation performed with SMART Product Drivers is called a User Orientation. Orienting your interactive whiteboard ensures the greatest possible level of writing and touch accuracy.
Orient your interactive whiteboard if your projector or interactive whiteboard has moved since you last used it, or whenever the mouse pointer isn’t properly aligned with your finger or a pen tray pen when you touch the screen.
The following table describes the different orientation types:
Default manufacturing orientation
When your interactive whiteboard uses the default manufacturing orientation data, the touch point on the screen corresponds fairly well to the projected computer desktop image, provided that the projected image fills the entire interactive screen. The default orientation is a simple 2-point orientation, which might result in the projected touch point being offset from the actual contact location. Increase the accuracy of your touch by performing a 9-, 12- or 20-point orientation.
Note
You can restore the default orientation parameters by holding the Reset button on the controller module for at least three seconds.
4- and 9-point user orientation
When you perform a quick 4-point or the standard 9-point orientation, the orientation data is saved in your interactive whiteboard controller module’s flash memory (that is, the orientation data stays with your interactive whiteboard). If you connect a different computer, the orientation data for your interactive whiteboard remains unchanged.
12- or 20-point user orientation
You can also perform a 12- or 20-point user orientation. Unlike the 4- and 9-point orientations, the drivers save the 12- and 20-point orientation data on your computer, so it stays with your computer instead of your interactive whiteboard. Resetting the controller module doesn’t clear the 12- or 20-point orientation data from your computer.
If you attach a different computer, your interactive whiteboard uses the highest level of orientation data in the controller’s memory.
To orient your interactive whiteboard
Press and hold the two large pen tray buttons at the same time.
OR
Press the Help button on the pen tray, and then select Orient/Align the SMART Product.
Note
For more information on the pen tray buttons, see Pen tray buttons.
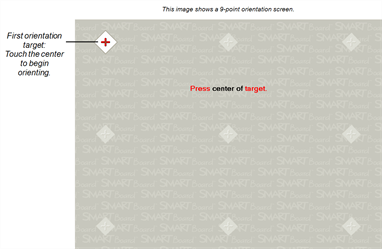
The orientation screen opens.
Pick up a pen from the pen tray.
Beginning at the upper-left corner of the screen, touch the center of the target firmly with the tip of the pen until the target moves to the next point. Try not to flick the pen when you lift it from the screen, and make sure that the lift direction is at a right angle to the screen.
Note
Although you can use your finger to orient your interactive whiteboard, a fine-point tool such as a pen tray pen provides greater precision when touching the targets.
Repeat step 3 until you arrive at the last point.
Note
If you aren’t satisfied with the precision of a particular point, press the left arrow key on your computer’s keyboard to repeat the orientation for that point.
At the last point, touch the center of the target firmly and continue pressing until the message “Please wait while Orientation completes” appears.
The orientation screen closes.
The orientation procedure can be 4, 9, 12 or 20 touches, depending on the precision setting you specify in your SMART Board Settings in the SMART control panel. The following procedure shows you how to change the precision setting.
To select a 4-, 9-, 12- or 20-point orientation procedure
Press the SMART software icon in the Windows notification area or Mac Dock, and then select Control Panel.
Press SMART Hardware Settings.
If you have more than one SMART product connected, select the appropriate interactive whiteboard.
Select Orientation/Alignment Settings from the drop-down list.
Select the desired orientation setting, and then press OK.
Perform an orientation procedure so that the changes take effect. See To orient your interactive whiteboard.