Connecting other devices
In addition to computers, you can connect a variety of other devices to the display:
USB drives, peripherals, and other devices
A second SMART Board interactive display
External displays
External video sources
External audio systems
Room control systems
Warning
Ensure that any cables that cross the floor to the display are properly bundled and marked to avoid a trip hazard.
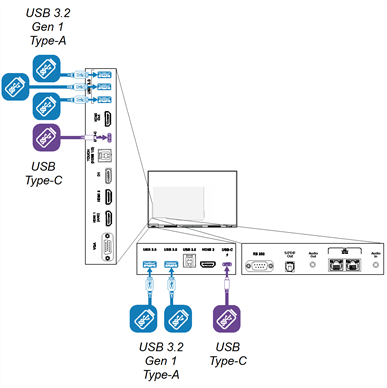
The display includes two USB 3.2 Gen 1 Type-A receptacles on the front connector panel and three USB 3.2 Gen 1 Type-A receptacles on the side connector panel. You can connect USB drives, peripherals (such as keyboards), and other devices to the USB 3.2 Gen 1 Type-A receptacles and use these devices with the display’s embedded OS or OPS slot computer. The display’s USB 3.2 Gen 1 Type-A receptacles will switch to the active input.
Notes
You can charge devices using the display’s USB Type-C receptacles:
Receptacle | Location | Maximum charging capacity |
|---|---|---|
USB-C 1 | Front connector panel Note When a module is installed in the accessory slot, the maximum charging capacity is 15 W. | 65 W |
USB-C 2 | Side connector panel | 15 W |
You can use a microSD card to increase the display’s internal storage capacity. The microSD card’s storage can be combined with the display’s internal storage so you can save additional files, media, and apps on the display. You can also format the microSD card for portable storage.
Note
When you format an SD card for portable storage, you can’t install apps on the SD card. You can transfer an SD card formatted for portable storage between devices.
SMART recommends a name brand microSD card that has the following specifications:
SDHC or SDXC flash memory
U1 or higher UHS speed class
C10 or higher video speed class
A minimum 10 MB/s transfer speed
Single partition
To increase the display’s storage capacity
Insert a microSD card into the display’s SD card slot.
A small SD card icon
 will appear in the top-left corner of the display’s Home screen when the SD card is installed.
Go to Settings
 Storage, open the drop-down menu at the top of the screen, and tap SD-CARD.
Tap the menu icon
 in the top-right corner of the Storage settings window, and tap Format.
A window appears providing options for formatting the SD card.
In the window that appears, tap Format another way in the bottom-right corner to switch between the following formatting options:
Caution
After the microSD card is formatted for internal storage, the appliance will distribute applications and data across all internal memory. Removing the microSD card after formatting for internal storage will result in data loss.
Format SD card for portable storage: The SD card is formatted as a separate storage device and is managed manually.
Format SD card for internal storage: The SD card is combined with the display’s internal memory and managed automatically.
Confirm the required formatting option dialog box is selected.
Tap Format and follow the on-screen instructions to format the SD card.
Verify that the SD card was added successfully by going to Home screen
SettingsStorage. Depending on how the SD card was formatted, the additional storage will be added to the display's internal storage or be listed as an additional storage option.

You can connect an external display using the HDMI Out connector on the connector panel. The external display will show the same image. This is useful when you’re using the display in an auditorium or other large space where it would be beneficial to have a second display.
Important
If the connected external display doesn’t support HDCP, the external display will not show the image.

You can connect an external video source, such as a DVD player, media box, or cable box, to your display using an HDMI cable and any of the HDMI connectors on the display’s connector panels. To view the source content, switch to the connected HDMI input.

You can connect the display to an external audio system using the Stereo 3.5 mm Out connector. This disables the display’s internal speakers. Alternatively, you can connect an external audio system directly to a room computer.

In addition to the Stereo 3.5 mm Out connector, the display provides a Sony/Philips Digital Interface (S/PDIF) Out connector. S/PDIF is a digital audio transmission medium. You need an audio system that has an S/PDIF input to decode this connection to analog. Most external sound bars include an S/PDIF connector.

You can also connect an external audio system to the display using the HDMI 2.0 Out connector on the side connector panel.

If you have an external audio system with HDMI ARC (Audio Return Channel), you can output the display’s audio to the audio system by connecting the display’s HDMI 1 connector on the side connector panel to the HDMI Out connector on the audio system’s receiver.
A room control system enables users to control a room’s lighting, audio system, and possibly, the display. Some installations may require you to integrate the display with a room control system.
You can use the display’s RS-232 connector to connect a third-party external control system to the display.
Note
SMART Board interactive displays are not compatible with centralized remote control systems, such as a universal remote control.