Using the microphones
The SMART SoundLift voice amplification solution supports the simultaneous pairing and connection of up to two microphones to the system’s receiver.
Important
SMART SoundLift must be enabled in the display's settings for input from a microphone to be available to the display’s applications, and heard through the display’s integrated speakers or an external audio system.
 About the microphone
A SMART SoundLift microphone has the following controls and features.
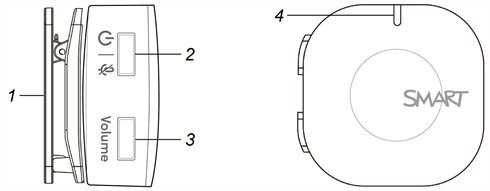
No. | Function | Description |
|---|---|---|
1 | Lapel clip | The microphones come with a magnet lapel clip that allows you to mount the microphone onto a piece of clothing. |
2 | Power/Mute/Pairing button |
|
3 | Volume/Noise cancellation button |
|
4 | LED | The LED indicates the pairing and battery status of the microphone. The LED status also indicates when the microphone’s volume control is being adjusted, the microphone is muted, and the noise cancellation feature has been enabled. |
About a microphone’s LEDA microphone’s LED provides status and troubleshooting information for the microphone.
LED status | Microphone status | Notes |
|---|---|---|
No light | Microphone is off. | N/A |
Flashing green | Waiting to connect with the receiver. | If a microphone does not connect with the receiver, it will automatically turn off after one minute. |
Flashing green rapidly | Pairing with the receiver. | If a microphone doesn’t pair with the receiver, it will automatically return to “waiting to connect” mode after one minute. |
Solid green | Paired and connected with the receiver. | Audio output from the microphone is available at the receiver. |
Flashing orange | Waiting to connect with the receiver while muted. | If a microphone is not connected with the receiver, it will automatically turn off after one minute. |
Flashing orange rapidly | Pairing with the receiver while muted. | If a microphone doesn’t pair with the receiver, it will automatically return to “waiting to connect” mode after one minute. |
Solid orange | Paired and connected with the receiver and muted. | Audio output from the microphone is available at the receiver; however, the microphone is muted. |
Flashing blue-green | Waiting to connect with the receiver with noise cancellation enabled. | If a microphone is not connected with the receiver, it will automatically turn off after one minute. |
Flashing blue-green rapidly | Pairing with the receiver with noise cancellation enabled. | If a microphone doesn’t pair with the receiver, it will automatically return to “waiting to connect” mode after one minute. |
Solid blue-green | Paired and connected with the receiver with noise cancellation enabled. | Audio output from the microphone is available at the receiver with noise cancellation enabled. |
Flashing red | Battery charge level is less than 3%. | Microphone will turn off after 5–8 minutes. |
Solid red | Battery is charging while in the charging case. | The red LED will turn off when the battery is fully charged. |
Flashing orange rapidly | The microphone’s volume control is being adjusted. | A microphone’s level of sound output (three levels) can be increased using the volume control feature. |
Solid blue | The microphone’s noise cancellation mode is enabled | Noise cancellation reduces background noise so remote listeners hear you clearly. |
Attaching or mounting a microphoneThe microphones come with a magnet lapel clip that allows you to mount the microphone onto a piece of clothing.
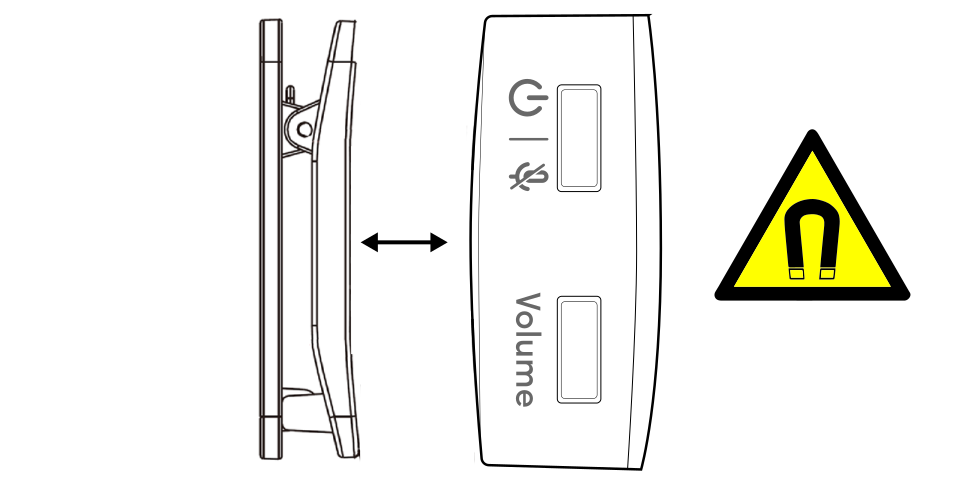
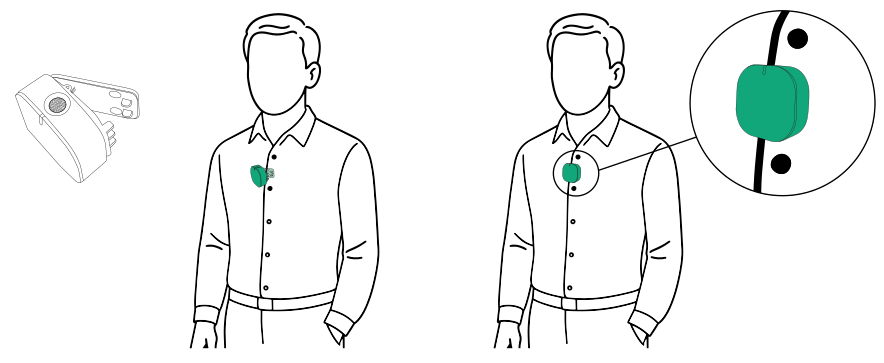
Microphone’s can be secured to the edge of clothing using the magnetic lapel clip. Simply, pinch the clip and position the microphone
Tip
Orient a microphone so its LED is pointing up towards your mouth.
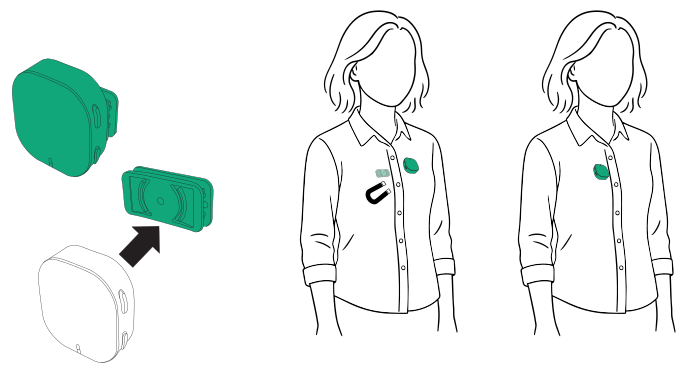
You can also place a microphone where you want on clothing, and use the magnet lapel clip on the other side of the clothing to secure it in place.
 Using a microphone
Important
A microphone won’t connect to the receiver and work unless it’s paired to a receiver. If a microphone’s LED continues flashing until the microphone turns off without connecting to a receiver, see Pairing the microphones.
Note
If a microphone loses its connection to the receiver, it turns off after one minute.
Tips
Charge microphones every night.
Speak at a normal conversational volume.
To turn a microphone on
Important
Don't turn up the display's volume too high when you first connect a microphone to the receiver. Setting the display and microphone volume too high can result in acoustic feedback or "squealing". Start with a lower volume setting on the display and microphone and increase both gradually until the desired sound output level is achieved.
Press and hold the Power button
 for at least two seconds.
The microphone also turns on when its removed from the charging case.
The microphone’s LED flashes green while the microphone connects to the receiver.
The microphone’s LED lights solid green when the microphone is connected with the receiver.
Note
The receiver will also beep when it connects with the microphone.
To turn a microphone off
Press and hold the Power button
for at least two seconds.The microphone also turns off when its placed into the charging case.
The microphone’s LED is off.
To mute a microphone
Press the Mute
 button.
The microphone’s LED is solid orange.
To change a microphone’s volume
Press the Volume button to increase the microphone’s level of sound output.
The microphone’s level of sound output increases each time the Volume button is pressed (three levels).
The microphone’s LED flashes orange indicating which volume level is selected (1–3 flashes).
To turn on a microphone’s noise cancellation mode
Press and hold the Volume button until the LED lights blue.
The microphone’s noise cancellation mode is now enabled.
To turn off the microphone’s noise cancellation mode, press and hold the Volume button until the microphone’s LED lights green.