Maintaining a microphone and its charging case
A microphone and its charging case each contain a rechargeable lithium-ion battery. Charge a microphone and charging case every night and over the weekend.
 Charging a microphone
To charge a microphone
Align the charging contacts on the microphone with those in the charging case, and place the microphone into the charging case.
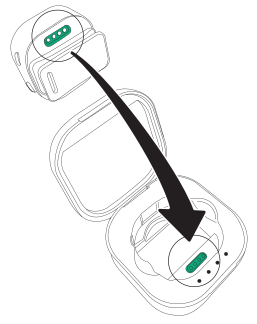
Place the microphone in the charging case until it magnetically snaps into place.
The microphone’s LED lights according to the microphone’s charging status.
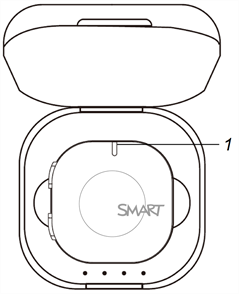
No.
Component
1
Microphone LED
Close the charging case.
Note
If the case is also charging, it can remain open.
Charging a charging caseTo charge a charging case
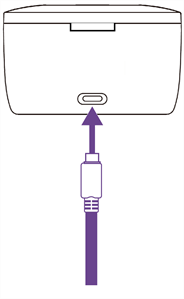
Connect the microphone charging case to a suitable power supply using the included USB Type-C to USB Type-C cable.
The LEDs on the charging case light according to the case’s charging status.
About the charging case’s LEDsWhen the microphone is placed in or removed from the charging case, the case's LEDs light for 5 seconds indicating the charge state of the case.
LEDs status | Charging case’s charge status | Notes |
|---|---|---|
4 × solid green LEDs | Fully charged. | N/A |
3 × solid green LEDs | 75-99% charged. | N/A |
2 × solid green LEDs | 50-74% charged. | N/A |
1 × solid green LED | 25-49% charged. | N/A |
While the charging case is charging, the case's LEDs light indicating the charge level being reached.
LEDs status | Charging case’s charge status | Notes |
|---|---|---|
4 × solid green LEDs | Fully charged. | N/A |
3 × solid green LEDs and 1 × flashing green LED | Charging to 100%. | N/A |
2 × solid green LEDs and 1 × flashing green LED | Charging to 75%. | N/A |
1 × solid green LED and 1 × flashing green LED | Charging to 50%. | N/A |
1 × flashing green LED | Charging to 25%. | N/A |
Replacing the microphone and receiver batteriesThe SMART SoundLift microphone and receiver each use one battery. A video providing instructions on how to replace the batteries is available on the Training and videos page.