Using SMART Recorder to record lessons
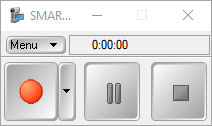
Using SMART Recorder, you can record your actions on your interactive display and your whole lesson. If you connect a microphone to your computer, you can record your voice as well.
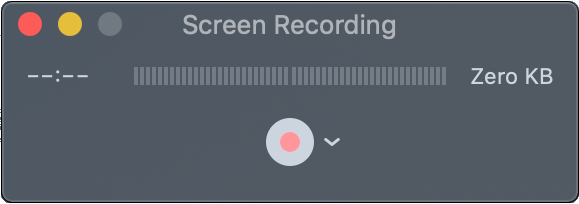
After you create a recording, you can play the recording on any computer using Windows Media Player (Windows operating systems) or QuickTime software (macOS operating system software).
To record a lesson
Tap the SMART Board icon
 in the notification area and then select Recorder to open the SMART Recorder.
Note
If your computer isn’t currently connected to a SMART interactive product, the SMART Board icon includes an X in its lower-right corner
 . You can still access the SMART Recorder if you’re not connected to an interactive product.
If you want to change options such as the quality, format, save location, and more, select Menu > Options.

You’ll have the following options:
Tab
Options
Recording Quality
Sound quality: A higher sound quality produces better audio playback but will increase the file size.
Video quality: A higher frame rate produces higher quality recordings but also increases the file size.
Tip
If you select Automatic Selection (Recommended), SMART Recorder automatically evaluates your computer and selects the optimal frame rate.
Video format
Windows Media Video (*.wmv): Any version of Windows Media Player can play a Windows Media video file.
SMART Recorder Video (*.avi): Windows Media Player can play a SMART Recorder video file if SMART Notebook software is installed on the computer playing the file.
Note
You can convert a SMART Recorder video file to a Windows Media video file by sharing the recording (see Sharing a recording).
Target Files
Use the options here to choose the default location for saving your recordings. You can also choose to have a warning message appear if the available space for your chosen save location is running low.
Tip
For best performance, save the files on your computer’s hard disk rather than a network drive.
Watermark
There are three watermark options:
No watermark
Image watermark
Text watermark
If you select an image or text watermark, you can set properties such as transparency, color, and more.
Tap the arrow next to the Record
 to select the area you want to record:
 Record desktop: Record the whole screen. If you have multiple displays, you will be asked to select the one you want to record.
Record Area: Draw a rectangle around the area you want to record.
Record Window: Select the window you want to record.
The recording begins as soon as you select the area you want to record.
Tip
Don’t want the SMART Recorder to appear in the recording? Hide it by selecting Menu > Hide to System Tray. To show the SMART Recorder again, tap the SMART Recorder icon
 in the notification area, and then select Show.
Perform the actions you want to record. If you connected a microphone to your computer, speak into your microphone to capture the sound. If you want to pause your recording, tap Pause
 . To resume recording, tap Record
 .
.Notes
To pause the recording while the SMART Recorder window is hidden, tap the SMART Recorder icon
 in the notification area, and then select Pause.
To resume recording, tap the SMART Recorder icon in the notification area, and then select Record.
After you complete the actions you want to record, tap Stop
 in SMART Recorder.
Note
To stop the recording while SMART Recorder is hidden, tap the SMART Recorder icon
 in the notification area, and then select Stop.
The Save As dialog box appears. Type a file name and tap Save.
After SMART Recorder creates the video file, the Recording Complete dialog box appears. The information in this dialog box includes the file location of the recording, file size and duration of the recording.
If you want to view the recording after you close this dialog box, select Play Recording.
If you want to share the recording with others, select Share Recording.
If you want to share a recording with others, create a Windows Media video file that they can play using Windows Media Player, or create a self-extracting file that they can play on any computer.
To convert a SMART Recorder video file
Select Menu > Share Recording in SMART Recorder.
Note
If SMART Recorder is hidden in Windows operating systems, tap the SMART Recorder icon
 in the notification area, and then select Configure Options.
The Share Recording dialog box appears.
Select WMV to create a Windows Media video file.
OR
Select Self extracting to create a self-extracting file, and then tap Next.
Tap Browse.
Browse to and select the SMART Recorder video file you want to convert, and then tap Open.
Tap Next.
If you want to change the converted file’s location or name, tap Browse, browse to the location where you want to save the file, type a file name, and then tap Save.
Tap Next.
Tap Finish.
If your system performance is slow when you use SMART Recorder, or the recording quality isn’t the standard you want, the following may improve performance:
Select a lower video quality setting. You need to balance your expectations for video quality with your computer’s limitations. Higher video quality produces larger files and places higher demands on your computer.
Reduce your computer’s screen resolution and display color settings. Smaller screens and fewer colors result in faster performance.
Save your files to a local hard disk. Network drives are slower and reduce performance.
Try a different video card. Some video cards perform better than others. PCI Express cards generally provide a faster performance than Accelerated Graphics Port (AGP) or Peripheral Component Interconnect (PCI) cards.
To reduce the screen resolution and display colors
Open Windows Control Panel.
Tap Display, and then tap Change display settings.
Select a lower setting in the Resolution drop-down list.
Select a lower setting in the Colors drop-down list.
Tap OK.
To disable hardware acceleration
Note
This procedure may vary depending on your version of Windows operating system and your system preferences.
Important
Disabling hardware acceleration can reduce the performance of SMART Notebook software.
Open Windows Control Panel.
Tap Display, tap Change display settings, and then tap Advanced settings.
Tap the Troubleshoot tab.
Drag the Hardware Acceleration slider to None.
Tap OK.
Restart your computer.
To record a lesson
Tap the SMART Board icon
 in the Mac menu bar , and then select Recorder to open the SMART Recorder.
Note
If your computer isn’t currently connected to a SMART interactive product, the SMART Board icon includes an X in its lower-right corner
 . You can still access the SMART Recorder if you’re not connected to an interactive product.
Tap the arrow next to the Record
 to select the microphone you want to use to record sound (or select None to record no sound) and choose whether or not you want mouse clicks to be captured in the recording.
Tap Record
 . The SMART Recorder automatically hides in the Mac menu bar and you must do one of the following to select the area you want to capture:
Record the full screen: Click anywhere on the screen.
Record part of the screen: Click and drag to create a rectangle over the area you want to record.
The recording begins as soon as you select the area you want to record.
Perform the actions you want to record. If you connected a microphone to your computer, speak into your microphone to capture the sound.
After you complete the actions you want to record, tap Stop in the Mac menu bar.
QuickTime Player opens with your recording. You can play it to view the recording. When you’re ready to save the video, from the QuickTime Player menu, select File > Save.
Tips
You can use QuickTime’s File > Export options to select a video quality.
You can use QuickTime’s File > Share options to share your recording.
Keywords |
|