Using the display’s
To open the Widgets menu, open the side Toolbar and tap the More icon .
.
SeeSide Toolbar
You can pin up to four of your favorite to the Compass menu to make them easier to find from the Home screen.
SeeCompass
Note
Widgets always appear on top of other open windows, programs, and connected devices.
The Widgets menu features the following tools and controls:
Icon | Widgets | Function | For more information |
|---|---|---|---|
| Overlay | Write on an overlay on top of any app, video, website, document, or image, including input from a connected computer. Saving to cloud storage is also supported. | |
 | Timer | Start a countdown timer. | |
 | Spotlight | Use the Spotlight during a presentation to draw attention to an area of a screen. | |
 | Screen Record | Use the Record to record your actions on the display. | |
 | Freeze | Freeze and zoom the current image on the screen. | |
 | PIP | Use the picture-in-picture (PIP) widget to show a different input in a smaller floating window while using other apps on the display. | |
 | Screen Lock | Lock the screen. | |
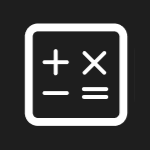 | Calculator | Open an on-screen calculator. | |
| Screen Shot | Capture screen captures of anything on the screen, including content from apps, websites, and videos. Select Freedom, Full, and window mode. You can add captured screens to a whiteboard and edit them. | |
| Quick Poll | Quickly create an online poll that enables participants to cast votes and answer single multi-choice questions using their mobile devices. | |
| Easy upload | Enable user’s to quickly and simply upload document and image files from their mobile devices to the display. |
Use the Overlay to write or draw over the currently displayed screen contents. After you finish, you can save the overlay to the Files library.
To write or draw on an overlay
Tap the Overlay icon
 .
.Use the display’s pens or your finger to write or draw in digital ink.
If you want to keep the overlay, tap the Save icon
 to save the image file to the display in .jpeg format.
When you’re done, tap the Close icon
 to exit the overlay.
To erase ink on an overlay
Tap the Eraser icon
and move your fist or palm over the digital ink.
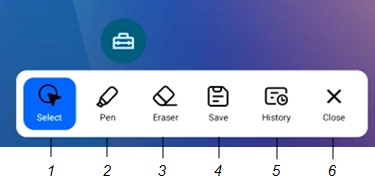
No. | Tools and controls |
|---|---|
1 | Select tool. When the Select tool is active, your touch passes through the overlay and interacts with the screen contents behind it. |
2 | Pen tool. When the Pen tool is active, your touch draws digital ink on the overlay. Press and hold to access options for changing the pen size and color. |
3 | Eraser tool. When the Eraser tool is active, you can erase digital ink by moving your fist or palm over the ink. |
4 | Save the current overlay. |
5 | View and edit previously saved versions of the current overlay. |
6 | Remove the overlay and close the Overlay widget. |
Tap the Timer icon
.The Timer tool opens:
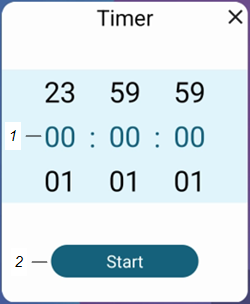
No.
Control
1
Timer display (left to right): hours, minutes, seconds. Slide your finger up or down on the numbers to customize the countdown timer.
2
Start the countdown timer.
Tap Start to start the countdown timer.
This image and table describe the options available after the timer has started:
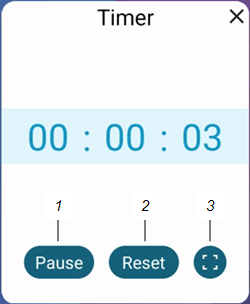
No.
Control
1
Reset the countdown timer.
2
Pause the countdown timer.
3
Make the countdown timer full screen.
To close the Timer tool
Tap theClose icon
 .
.
You can use the Spotlight during a presentation to draw attention to a particular screen area.
To use the Spotlight
Tap the Spotlight icon
.The Spotlight is activated:
No.
Control
1
Change the spotlight’s transparency.
Tip
You can also use finger gestures to change the size of the spotlight area.
2
Close the Spotlight .
Press and drag the Spotlight window to highlight an area of the screen.
To close the Spotlight
Tap the Close icon
 .
.
You can use the Screen record to record a video of the on-screen activity.
To use the Record
Tap the Record icon
.A dialog box appears identifying the information the Screen record will access.
To access the Record controls, tap Start now.
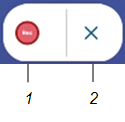
No.
Control
1
Begin recording.
2
Close the Record .
Tap the Rec icon
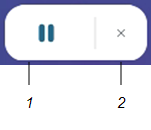
 .
.If you want to pause the recording, tap the Pause icon
 .
.
Tap the Rec icon
to resume recording.To stop the recording, tap the Stop icon
 .
.The Save to dialog box appears.
Tap OK to save the screen recording to the display.
To close the Screen record
Tap the Exit icon
 .
.
You can use the Freeze widget to temporarily freeze the screen.
Note
Freezing the screen does not pause running applications on the connected computer. It simply freezes the display of those applications.
To use the Freeze
Tap the Freeze icon
.The Freeze controls appear:
No.
Control
1
Return to the default screen size.
2
Close the Freeze .
Tap the Freeze button
 to freeze the screen.
Press and drag the frozen image to move it on the screen.
Tip
You can also use pinch-to-zoom finger gestures to zoom in or out.
Tap the Resume icon
 . to unfreeze the screen.
To close the Freeze
Tap the Close icon
 .
.
The picture-in-picture (PIP) enables you to show a different input in a smaller floating window you can position anywhere on the screen. The floating window appears on top of open apps, allowing you to continue viewing the second input while interacting with other apps or websites.
To use the PIP
Tap the PIP icon
.The PIP opens:
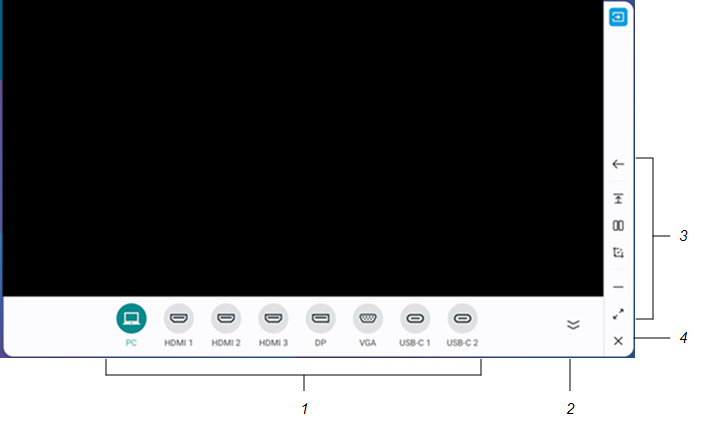
No.
Control
1
Select an input.
2
Hide the input option items.
3
Controls for expanding or hiding the input window, viewing the input widow in split screen mode with another open app, annotating and saving the input window image, and more.
4
Close the PIP .
Tap an input to appear in the second window.
Tap the Enter icon
 to view the selected input in full screen.
Note
If the selected input also has a USB cable connected for touch, you can control this input via touch, directly within the PIP window.
To close the PIP
Tap the Close icon
 .
.
Use the Screen Lock feature to secure the display’s screen. When the screen lock is enabled, a pattern, PIN, or password. must be entered to unlock the screen.
Note
Creation of a screen lock is part of the display’s initial set up. You can also configure the Screen Lock feature in display settings.
To lock the screen
- Tap the Screen Lock icon.
A pattern, PIN, or password must now be entered to unlock the screen.
Tip
If the screen lock isn’t configured, a message appears confirming no password is set. Tap Confirm to access options for configuring the screen lock.
Open an on-screen calculator that appears on top of applications running on the display.
To use the Calculator
- Tap the Calculator icon.
To close the Calculator , tap the Close icon
 .
.
The Screen Shot toolbar enables you to take a screen capture of a rectangular area or the entire screen.
To use the Screen Shot
Tap the Screen Shot icon
 .
.The Screen Shot opens:
No.
Control
1
Insert the selected window or screen into a new whiteboard..
2
Select the entire screen.
3
Save the captured screen to the display.
4
Close the Screen Shot .
5
Resize the selected window.
Select the area or screen you want to capture.
Tap the Save icon
 to save the selected window or screen.
Type a file name for the captured image and tap OK.
The captured image is saved on the display to the default folder.
Use the Quick poll to create an online poll that enables participants to cast votes and answer single multi-choice questions using their mobile devices..
To use the Quick Pole
Tap the Quick Pole icon
 .
.The Quick Pole opens:
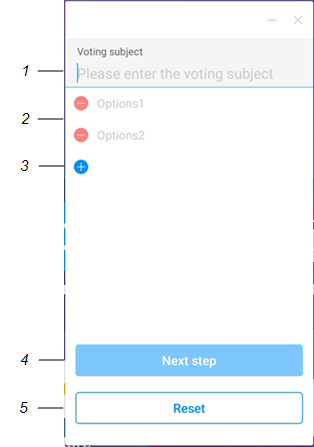
No.
Control
1
Add a voting subject.
2
Add voting options.
3
Add additional voting options.
4
Move to the next step in creating the online poll.
5
Clear the entered voting subject and options.
Type a subject for the quick poll in the Voting subject text box.
Type voting options in the Options text boxes
Tap Next step to move to the next configuration options.
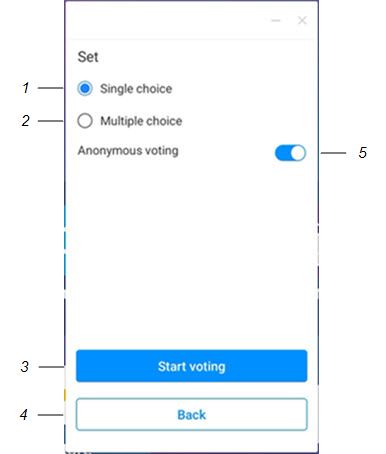
No.
Control
1
When Single choice is enabled, participants can only select a single voting subject.
2
When Multiple choice is enabled, participants can select multiple voting subjects.
3
Start the poll.
4
Go back to the previous dialog box.
5
When Anonymous voting is enabled, participants are not prompted to type a name before submitting their votes.
Tap Start voting.
A QR code appears for participants to scan with their mobile devices and begin submitting their votes.
To end voting and view the results of the poll, tap End voting in the Quick poll dialog box.
The results of the poll appear on the display’s screen.
Use the Easy Upload to enable user’s to quickly and simply upload document and image files from their mobile devices to the display.
To use the Easy Upload
Tap the Easy Upload icon
 .
.The Easy Upload opens displaying a QR code.
Scan the QR code with your mobile device to begin uploading files to the display.
A file transfer window opens on your device.
Browse to the file you want to upload.
Tip
You can select multiple files to upload.
Tap Send to upload the selected files to the display.
A preview of the uploaded files appears in the Easy Upload dialog box.
Files uploaded to the display are saved in the QuickPassDownload folder in File manager.
To close the Easy Upload
Tap the Close icon
 .
.