Configuring the interactive flat panel for the best audio performance
Consider these factors as you configure an interactive flat panel for the best audio performance:
Room acoustics
System gain
Gain staging
Ground loops
Acoustic Echo Cancellation (AEC)
Equipment placement
The importance of room acoustics varies depending on the room’s size and intended use. If you plan to enable voice conferencing in a large room, such as a board room or a lecture space, room acoustics are more important than they would be in a small classroom or meeting space where voice conferencing is not likely to be used often. Sound absorption can be required in large, open areas in which sound can echo freely.
Use this simple test to check the room’s acoustics: Stand in different parts of the room and count to ten loudly. If you hear anything other than your own voice (such as a rattle, buzzing from elsewhere in the room or echoes), the room may require some modifications to improve the acoustics.
A number of features in a room can affect its acoustics:
Feature | Details |
|---|---|
Hard surfaces | Hard surfaces in a room (such as brick, cement or glass) can cause sound to echo and distort, which can cause muffled or echoing audio during a voice conference. |
Flooring | Tile, hardwood and laminate flooring are hard surfaces that can cause echoes and distortion. Carpeted floors offer more absorption of unwanted sounds. |
Ceiling | A dropped ceiling with regular ceiling tiles can greatly change the acoustics of a room. Alternatively, a high, open or cavernous ceiling can also affect audio quality. |
Note
Consult a sound reinforcement specialist before making changes to a room’s acoustics.
There are a number of things you can do to improve a room’s acoustics:
Improvement | Details |
|---|---|
Install acoustic tiles or foam | Acoustic tiles or foam absorb and diffract sound waves, helping to minimize sound distortion (especially in rooms that have long parallel walls and hard surfaces). |
Install ceiling tiles with better acoustic absorption | Although all types of ceiling tile offer a degree of sound absorption, some provide more sound absorption than others. Look for ceiling tiles that have a higher sound attenuation rating. This sound absorption ability is rated on a scale of 0 to 1 or as a Noise Reduction Class on the same type of scale. Higher numbers are better. |
In electronic systems, gain is a measurement of the input signal’s strength in relation to the strength of an output signal. Absorption, scattering and other electrical impedance can reduce signal strength as the distance the signal has to travel increases. To account for this reduction and to help prevent the introduction of noise or other signal distortion, include controls for adjusting the gain, typically by increasing or decreasing the signal’s strength.
In audio systems, the input signal passes from the source device, such as a computer, through cables to (potentially) multiple devices. Each point within an audio system can introduce distortion or weakening of the audio signal, which in turn affects the system’s audio quality. However, any audio system device that that has a volume control can be used to adjust the system’s gain. Each device with audio controls is considered a “gain stage” and can be used in a process called “gain staging” to provide the best possible audio.
Gain staging involves adjusting the signal levels, such as audio, of a series of gain stages to prevent introduction of noise and distortion. Most in-room audio systems will require some sort of adjustment at each gain stage to provide the best audio.
Begin gain staging adjustments at the system’s first adjustable volume control (likely at the audio signal’s source, such as a computer), and end at the system’s final volume control (such as a set of speakers).
To gain stage an audio system with an interactive flat panel
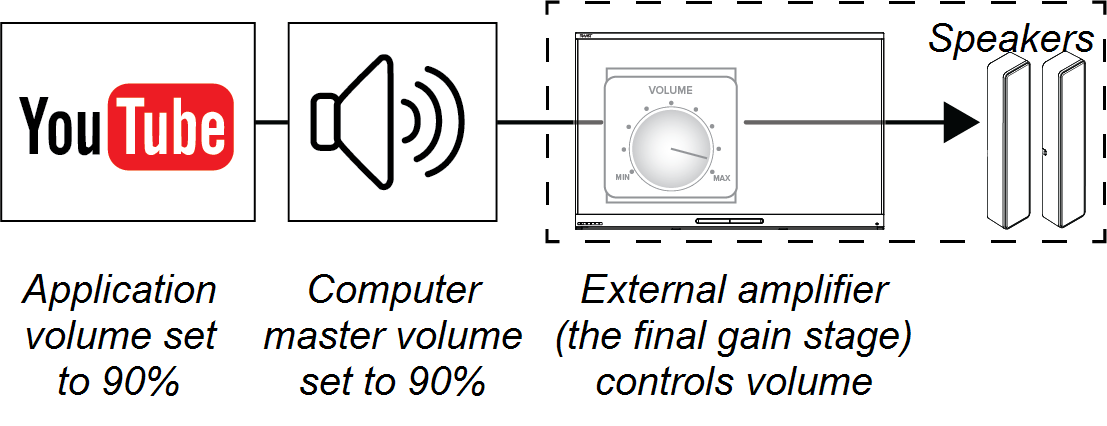
Set the volume on all but the last gain stage to 75%–95%. The following example demonstrates this procedure:

A
Audio signal source (a media player on the computer connected to the interactive flat panel)
B
Interactive flat panel
C
External speakers
Note
Some speakers do not include a volume control.
This example includes four gain stages at which volume can be adjusted:
Volume control in the media player software
Volume control on the computer
Volume control on the interactive flat panel
Volume control on the speakers
Starting with the beginning of the audio signal (in this case, the media player), set the first three gain stages’ volume controls to 75%–95% to push the clearest audio signal from the first gain stage to the last gain stage without overloading the system. Then, at the final gain stage, use the volume controls on the speakers to adjust the sound for the room.

Note
Starting with a lower volume in the first gain stages and increasing the volume elsewhere will amplify any bad qualities (such as noise) of the audio signal.
If a system includes multiple gain stages or a long path for the audio signal, audio latency and additional signal processing can result in issues with Acoustic Echo Cancellation (AEC). Reducing the number of gain stages in the system to shorten the audio signal’s path may be helpful.
A setup that includes an interactive flat panel and a connected computer may include additional options for connecting audio devices. Speakers are commonly connected to the interactive flat panel and act as the final gain stage. If the computer offers an audio connection, the speakers can be connected to the computer, reducing the gain stage count and shortening the audio signal’s path.
A ground loop is a low buzzing or hum from the speakers. Ground loops can result when two pieces of equipment are plugged into two different outlets that are on different electrical breaker circuits.
The best way to avoid ground loops is to have all devices powered by the same outlet. If this isn’t an option, use an AC mains isolation transformer on the audio signal’s source device (such as the computer). This will match the source’s grounding to the interactive flat panel to which the audio source is connected.
Warning
Never remove the earth ground pin from an AC cable, as this can create the potential for electrical shock.
Issues with AEC are among the most common that can arise in installations that employ both microphones and speakers, especially with installations using components not provided by SMART.
When AEC issues occur, both remote participants and participants in the meeting room will likely hear an echoing when others are speaking.
Note
If you hear an echo of your voice during a conference call with remote participants, the issue is likely with one of the remote participants’ devices. Have individual participants mute their microphones one at a time.
Equipment placement can help alleviate AEC issues.
After you’ve determined that a room is acoustically acceptable, consider the relative placement of sound-recording devices (speakerphones, microphones, webcams, and so on) and playback devices. This helps to avoid AEC issues.
If the speakers are above or below the interactive flat panel, maintain a line of sight between the speakers and the microphones.
Test the setup by making a few calls.
Never place a microphone immediately in front of speakers. Such microphone placement can cause audio issues or loud, unpleasant feedback.
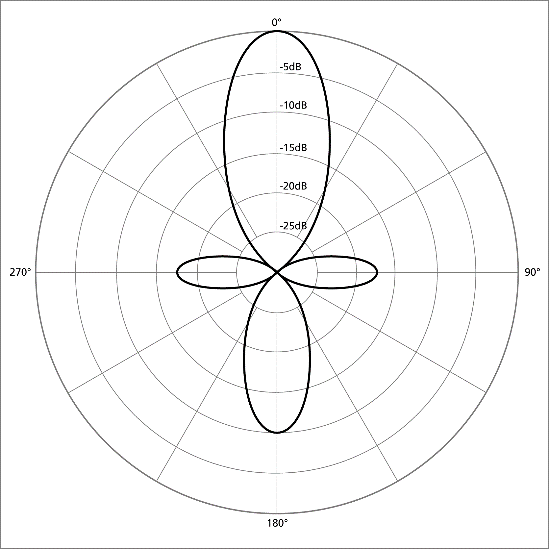
Look at how the polar pattern for the microphone captures the sounds around it:

Although speakers are typically located to either side of the interactive flat panel, the room shape, size and acoustics might make it necessary to place them elsewhere.