Using the on-screen display menu
Use the control panel on the right side of your interactive flat panel to access the on-screen display menu and adjust settings.
Button | Details |
|---|---|
Power | Turn the interactive flat panel on or turn off |
UP | Move the highlighted area up to select items in the on-screen display menu |
DOWN | Move the highlighted area down to select items in the on-screen display menu |
VOL + | Move the highlighted area left to select items in the on-screen display menu, increase the audio output level or increase a value |
VOL - | Move the highlighted area right to select items in the on-screen display menu, decrease the audio output level or decrease a value |
MENU | Display the on-screen display menu |
INPUT | Select a video input for the interactive flat panel |
Use the remote control to access on-screen menus and to change the interactive flat panel’s settings.
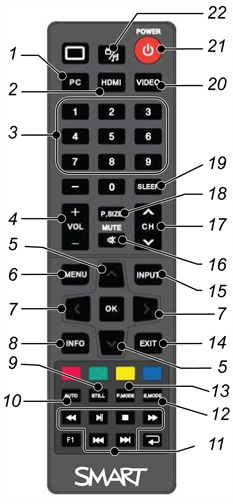
No. | Button | Details |
|---|---|---|
1 | PC | Selects the VGA input |
2 | HDMI | Select the HDMI input |
3 | [Number buttons] | Press buttons on the number pad to change channels |
4 | VOL +/- | Increase or decrease the audio output level |
5 | [Up and down buttons] | Select a menu option in the on-screen display menu |
6 | MENU | Display the on-screen display menu |
7 | [Left and right buttons] |
|
8 | INFO | Display the current video source |
9 | STILL | Turn still picture mode on or off |
10 | AUTO | Automatically adjusts the VGA video input Important This automatically adjusts the image to match the settings the display adapter is sending. In most cases, this will solve touch issues. You can adjust the display settings of the interactive flat panel if needed. |
11 | [Media buttons] | For use in Multi Media mode |
12 | S.MODE | Switch between stereo and mono sound |
13 | P.MODE | Switch between color modes |
14 | EXIT | Close the on-screen display menu |
15 | INPUT | Switch video inputs |
16 | MUTE | Mute the sound |
17 | CH +/- | Change channels |
18 | P.SIZE | Select the video aspect ratio |
19 | SLEEP | Set the sleep timer |
20 | VIDEO | Select the RCA input |
21 | Power | Turns the interactive flat panel on or off |
22 | Multi Media button | Display the Multi Media mode |
Note
SMART Board 4084 interactive flat panels can have one of two versions of on-screen display (OSD) menu.. This section applies to SMART Board 4084 panels with a serial number in the range of M101IW02E3001 to M101IW12E3126.
You can access the on-screen display (OSD) menu by pressing MENU on the side panel of your interactive flat panel or on the remote control. To exit the OSD menu, press MENU on the interactive flat panel’s side panel, or press EXIT on the remote control.
Option | Value | Function |
|---|---|---|
Picture Mode | Custom Standard Mild Vivid | Sets the picture mode |
Brightness | 0-100 | Sets the overall brightness of the image and background |
Contrast | 0-100 | Sets the brightness of the image in relation to the background |
Tint | 0-100 | Sets the tint of the screen |
Color | 0-100 | Sets the image color intensity |
Sharpness | 0-100 | Sets the image sharpness |
Color Temp | Normal Warm Cold | Sets the color temperature |
Option | Value | Function |
|---|---|---|
Surround | [N/A] | Turns the surround sound on or off |
Sound Mode | Music Standard User News Movie | Sets the audio mode |
Auto Volume | [N/A] | Turns the automatic volume adjustment on or off |
Option | Value | Function |
|---|---|---|
Menu Language | [Languages] | Sets the on-screen display menu’s language |
Menu Trans. | [N/A] | Sets the on-screen display menu’s transparency |
Screen Mode | 16:9 4:3 Zoom1 Zoom2 Full | Sets the image size |
Reset | [N/A] | Resets all Setup options |
Software Update | [N/A] | Note Software updates should be performed only by a system administrator. Please contact your authorized SMART reseller if you require further assistance. |
Option | Value | Function |
|---|---|---|
Time mode | Automatic Manual | Sets the time mode |
Time | [N/A] | Sets the time manually |
Sleep Time | [N/A] | Sets the sleep timer |
On Timer | [N/A] | Turns on the On Time function |
On Time | [N/A] | Sets a time when the interactive flat panel turns on |
Volume | 0-100 | Sets the volume when the interactive flat panel turns on |
Off Timer | [N/A] | Turns on the Off Time function |
Off Time | [N/A] | Sets a time when the interactive flat panel turns off |
Note
There are two versions of the SMART Board 4084 on-screen display (OSD) menu. This section applies to SMART Board 4084 panels with a serial number of M101IW12E3127 and greater.
You can access the OSD menu by pressing MENU on the side panel of the interactive flat panel or on the remote control. To exit the OSD menu, press MENU on the interactive flat panel’s side panel, or EXIT on the remote control.
Option | Value | Function |
|---|---|---|
Picture Mode | Standard Dynamic Mild User | Sets the picture mode |
Color temperature | Medium Warm Cool User | Sets the color temperature |
Screen (when connected with VGA) | [N/A] | Sets the size and position of the picture |
Aspect ratio | Full 4:3 16:9 Zoom 1 Zoom 2 Just scan | Sets the aspect ratio |
Color range (when connected with HDMI) | 0 ~ 255 16 ~ 235 | Sets the image color intensity |
Option | Value | Function |
|---|---|---|
Sound Mode | Standard Music Movie Sports User | Sets the audio mode |
Balance | -50–+50 | Sets the audio balance |
Auto Volume | [N/A] | Turns the automatic volume adjustment on or off |
Surround sound | [N/A] | Turns surround sound on or off |
SPDIF mode | PCM RAW | Sets the digital sound output |
EQ | ||
120 Hz | 0–100 | Sets the parametric equalizer adjustments for 120 Hz |
500 Hz | 0–100 | Sets the parametric equalizer adjustments for 500 Hz |
1.5 K Hz | 0–100 | Sets the parametric equalizer adjustments for 1.5 kHz |
5 K Hz | 0–100 | Sets the parametric equalizer adjustments for 5 kHz |
10 K Hz | 0–100 | Sets the parametric equalizer adjustments for 10 kHz |
Internal speaker | [N/A] | Turns the internal speaker on or off |
Option | Value | Function |
|---|---|---|
OSD | ||
Language | [Languages] | Sets the on-screen display menu’s language |
Transparency | 0 25 50 100 | Sets the on-screen display menu’s transparency |
Time | 5 15 30 45 60 | Sets the time to display the on-screen display menu |
ECO mode | 0–100 | Sets ECO mode |
Auto Sleep | off on | Turns auto sleep on or off |
Auto Power | last off on | Sets auto power |
Firmware Ver. | [N/A] | Displays the scaler and FRC firmware versions |
Software Update | [N/A] | Note Software updates should be performed only by a system administrator. Contact your authorized SMART reseller if you require further assistance. |