Connecting power and devices
The connector panel is at the bottom of the interactive flat panel.

No. | Connector | Details |
|---|---|---|
1 | AC power pass-through | |
2 | USB B receptacle | Computer to interactive flat panel touch interface |
3 | Video in | Component video receptacle |
4 | Service port | Warning Do not use this connector. This service connector for the interactive flat panel must be used only by a qualified technician. |
5 | Audio out | Audio receptacle (SPNL-4075 and SPNL-4084) |
6 | USB A | Media port (see Using Multi Media mode) |
7 | Video in | Composite video receptacle |
8 | Video in | PC-RGB (VGA) Important If the display flickers or is not sized correctly, press the Auto button to resolve the issue. Ensure that you use the recommended resolution for best performance. 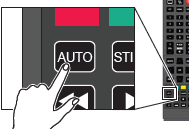 |
9 | Audio in | Stereo 3.5 mm connector (from computer) |
10 | Video in |
When you connect cables to the interactive flat panel from a computer and other peripheral devices, ensure that the cables aren’t a trip hazard. Use channels and raceways to safely secure and hide cables. Contact your authorized SMART reseller for these accessories.
Important
Do not connect the power cable to a power outlet until you have connected all cables to the interactive flat panel.
If you’re using multiple displays or a laptop connected to the interactive flat panel, ensure that they are set up correctly.
Check the graphics card configuration (see Graphics card configuration).
Check the panel settings (see Panel settings).
Calibrate or clear previously set calibration data.
If you’re using an unsupported graphics card configuration, you may experience display problems or issues with touch accuracy. For example, you may experience issues if your graphics card scaling option is set to something other than full-screen.
Important
If you're using an ATI video card, go to the ATI Catalyst Control panel's Flat Panel menu, select Pixel Format and change it to RGB 4:4:4 timing.
Ensure that you set Screen Mode to 16:9 or Full, and that you select the correct input source.
To select input
Press Input on the interactive flat panel’s side panel or remote control, and then use the arrows to select the correct input source.
To set Screen Mode
Press Menu on the remote control or on the side panel.
The on-screen display menu appears.
Press the up and down buttons and select Setup.
Press the right button on the remote control or VOL- to select Screen Mode.
Select 16:9 if not already selected.
When you connect a computer to the interactive flat panel, you may have to adjust the computer’s screen resolution to achieve the best image quality and touch performance.
Note
SMART recommends using 3840 × 2160, 1920 × 1080 or 1280 × 720 screen resolutions for best image quality and touch performance.
The interactive flat panel can use the following screen resolutions:
3840 × 2160 (for SPNL-4075 and
SPNL-4084 when using HDMI and a
computer that supports 4K UHD)1920 × 1080
1600 × 1200
1280 × 1024
1360 × 768
1280 × 960
1280 × 768
1280 × 720
1024 × 768
800 × 600
640 × 480
Windows operating systems only
To configure your Windows computer’s screen resolution
Note
This procedure varies depending on your version of the Windows operating system and your system preferences.
Right-click the desktop and then select Screen Resolution.
From the Display drop-down menu, select your interactive flat panel.
From the Resolution drop-down menu, select a screen resolution.
Click OK.
Your computer applies the new screen resolution
macOS operating system software only
To configure your Mac computer’s screen resolution
Select the Apple (
 ) menu > System Preferences.
The System Preferences dialog box appears.
Click Displays.
Select a screen resolution from the list.
Your computer applies the new screen resolution.
When you use your interactive flat panel with multiple displays (your computer has an additional monitor or a built-in display), you must ensure that your display settings are configured properly for your operating system.
Windows operating systems only
To set up the interactive flat panel as your touch screen
Notes
Ensure that the display resolution has been set to recommended settings before calibration.
Calibration may not be required. See Calibrating your interactive flat panel for more information.
Click Start > Control Panel > Tablet PC Settings.
The Tablet PC Settings dialog box appears.
In the Display tab, select your interactive flat panel from the display drop-down menu.
Click Setup.
The Identify pen or touch input screens dialog box appears.
Click Touch input.
A message appears on the interactive flat panel: “Touch this screen to identify it as the touchscreen.”
If necessary, press ENTER until the message appears on your touch screen.
Tap your touchscreen two or three times until the text changes.
Press ENTER to skip any remaining screens until the window closes.
Note
Do not touch any further touch screens as the correct association between the selected display and touch screen will be lost.
Click OK.
Important
If you have difficulty with the above procedure, set up your interactive flat panel as the primary monitor (or main display) and try again. You can switch your main display back to its original setting after you have successfully identified the interactive flat panel as the touch screen.
macOS operating system software only
When you use your interactive flat panel in a multiple display environment (that is, your computer has an additional monitor or a built-in display), you must ensure that the display settings are configured properly for the operating system.
To extend the desktop
Make sure the additional display is properly connected and turned on.
From the Apple menu, choose System Preferences.
From the View menu, choose Displays.
Click the Arrangement tab.
Clear the Mirror Displays check box.
To mirror the desktop
Make sure the additional display is properly connected and turned on.
From the Apple menu, choose System Preferences.
From the View menu, choose Displays.
Click the Arrangement tab.
Select Mirror Displays.
Models | |
Keywords |
|
Related documents |