Setting up your document camera
This section provides instructions on setting up your SMART Document Camera.
The document camera is designed with a flexible arm that enables you to position the camera head at different angles.
Note
Before setting up and connecting the document camera, ensure that all devices are powered off.
To unfold and position your document camera
Place a hand on the base of the document camera to stabilize it.
Press the camera head down, and then pull the camera arm outward and upward.
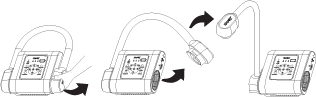
Move the camera head and aim the lens at your object.

Caution
Do not extend the camera head too far from the body, doing so can cause the unit to fall.
To connect your document camera to the power supply
Connect the power supply cable to the DC 12V port on the rear connection panel.
Connect the country-specific cable to the power supply.
Caution
Ensure the power cord is plugged into the camera as well as the wall.
Connect the plug to a power outlet.
Once the power is connected, the document camera will enter standby mode.
Press
 to power on the document camera.
To connect your document camera to a computer with a USB cable
Connect the USB cable to the USB port on the rear connection panel.
Locate the USB connector on the computer, and connect the USB cable.
Important
Ensure the WiFi indicator light is off before attempting to use the USB connection. If required, press the WiFi button on the control panel until the WiFi indicator light is off. For more information, see Control panel.
Note
For more information about extending USB connections, see the Troubleshooting and extending USB 2.0 and USB 3.0 connection knowledge base article.
To connect your document camera to computer with an HDMI cable
Connect the HDMI cable to the HDMI IN port on the rear connection panel.
Locate the HDMI OUT port on the computer, and connect the HDMI cable.
Notes
Ensure the TV/RGB switch is set to RGB.
Use the control panel to switch the video signal to a computer, press the Camera/PC button.
Use the remote control to switch the video signal to a computer, press the PC 1/2 button.
Models |
|
Keywords |
|
Related documents |