Connecting other devices
You can use USB drives, peripherals, and other devices with the appliance by connecting those devices to the appliance’s USB 3.1 Type-A, USB 3.1 Type-B, and USB Type-C receptacles.

Alternatively, you can connect USB devices to the USB receptacles on the display. For information about the type and location of USB receptacles on the display, see the display’s documentation.
Note
The USB Type-C receptacle is not suitable for charging devices.
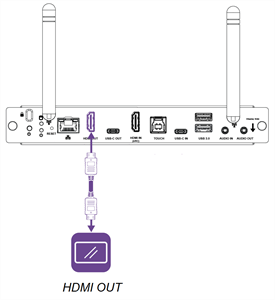
You can connect an external display to the HDMI out connector on the appliance (rather than the HDMI out connector on the display). This allows you to duplicate or extend the appliance’s desktop to the external display.
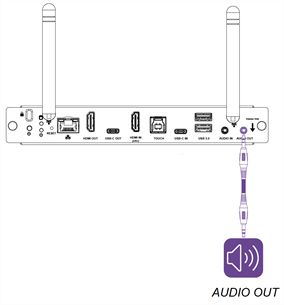
The appliance includes two stereo 3.5 mm connectors for connecting external analog audio devices.
You can connect the appliance to an externally powered analog audio system using the stereo 3.5 mm Audio OUT connector. You might want to connect an external audio system if you’re providing sound in a larger space.
Note
Connecting the appliance to an external audio disables the display’s internal speakers.
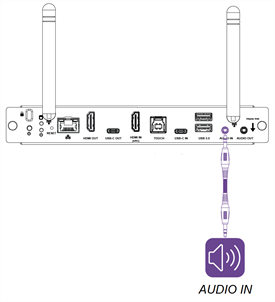
You can also connect the appliance to an external audio source using the stereo 3.5 mm Audio IN connector. Sound from the external audio source will play through the display's speakers.
You can use a microSD card to increase the appliance’s internal storage capacity. The microSD card’s storage can be combined with the appliance’s internal storage so you can save additional files, media, and apps on the appliance. You can also format the microSD card for portable storage.
Note
When you format an SD card for portable storage, you can’t install apps on the SD card or transfer the SD card between devices.
SMART recommends a name brand microSD card that has the following specifications:
SDHC or SDXC flash memory
Up to 80 MB/s transfer speed
U1 or higher UHS speed class
C10 or higher video speed class
Single partition
To increase the appliance’s storage capacity
Caution
Do not install or remove the appliance while the display is turned on. Ensure the power switch on the back of the display beside the AC power inlet is in the OFF (O) position. Using only the display's Power button is not sufficient.
If the appliance is installed in the display, turn the display off by turning the power switch to the OFF (O) position. (This switch's position varies among models of display. Check your display's support site pages for help finding the switch, if necessary.) Remove the appliance from the display.
Insert a microSD card into the appliance’s SD card slot.

Install the appliance in the display, and turn the display back on.
Open the display’s input menu and select the appliance input source.
A small SD card icon
 will appear in the top-left corner of the appliances Home screen when the SD card is installed.
Go to Settings
 Storage, open the drop-down menu at the top of the screen, and tap SD-CARD.
Tap the menu icon
 in the top-right corner of the Storage settings window to access options for formatting the SD card.
Choose either of the following options:
Caution
After the microSD card is formatted for internal storage, the appliance will distribute applications and data across all internal memory. Removing the microSD card after formatting for internal storage will result in data loss.
Format: The SD card is formatted as a separate storage device and is managed manually.
Format as internal: The SD card is combined with the appliance’s internal memory and managed automatically.
Follow the on-screen instructions to format the SD card.
Verify that the SD card was added successfully by going to Settings
Storage. Depending on how the SD card was formatted, the additional storage will be added to the appliance's internal storage or be listed as an additional storage option.