Using the teacher microphone
Control the input device’s volume directly from the teacher microphone. The teacher microphone is ideal for large spaces. For more information see Acoustics in the Installation best practices for SMART products (smarttech.com/kb/171035).
 About the Teacher microphone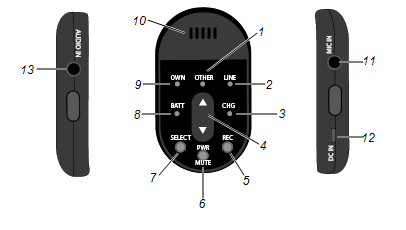
No. | Function | Description |
|---|---|---|
1 | OTHER | LED indicates that the volume buttons control the student microphone. |
2 | LINE | LED indicates that the volume buttons control the auxiliary audio source. |
3 | CHG | LED indicates charging status. See Charging the microphone. |
4 | UP and DOWN buttons | Controls volume for the selected audio source. |
5 | REC | LED indicates that the microphone is paired with the receiver. |
6 | PWR / MUTE button |
|
7 | SELECT button | Selects an audio source. |
8 | BATT | LED indicates battery charge level. See About the teacher microphone LEDs. |
9 | OWN | LED indicates that the volume buttons control the teacher’s microphone. |
10 | Microphone | [N/A] |
11 | MIC IN | Connect an external microphone (for example, a lapel or headset microphone). This mutes the internal microphone on the teacher microphone. |
12 | Mini USB A receptacle | Connects the USB power cable to charge the microphone. |
13 | AUDIO IN | Connects an external audio device using a a 3.5 mm audio cable. |
About the teacher microphone LEDsThe BATT and CHG LEDs provide status and troubleshooting information for the teacher microphone.
Status | Description |
|---|---|
BATT LED | |
Solid green | Microphone is on. |
Flashing green or flashing orange | Pairing with receiver or microphone is muted. |
Solid yellow | Battery is low. |
Flashing yellow | Microphone is out of range of the receiver. |
Solid red | Battery is depleted. |
Flashing red | Pairing error. See Resolving issues with the microphones. |
CHG LED | |
| Solid | Battery has finished charging. |
| Flashing | Battery is charging. |
| Flashing rapidly | There has been a charging error. |
Using the teacher microphoneTip
Wear the microphone 4–6" (10–15 cm) below your chin.
Charge the microphone every night.
Speak at a normal conversational volume.
Don’t turn up the speaker volume too high. If you can hear your voice, it’s too loud. Have another adult in the room help you set the volume.
To turn the teacher microphone on
Note
The power on sequence occurs within 5 seconds
There isn’t an audible beep when you turn on the microphone.
Press and hold the PWR/MUTE button for at least three seconds.
BATT LED briefly lights green.
BATT LED flashes orange while the microphone pairs.
The BATT LED lights solid green.
To turn the teacher microphone off
- Press and hold the PWR/MUTE button for at least three seconds.
To mute the teacher microphone
Press the PWR/MUTE button.
If the microphone is muted for more than five minutes, the microphone turns off to conserve battery.
To adjust the volume of the teacher microphone
Press the SELECT button until the OWN LED is lit.
Use the UP or DOWN buttons to adjust the volume.
To adjust the volume of the student microphone from the teacher microphone
On the teacher microphone, press the SELECT button until the OTHER LED is lit.
Use the UP or DOWN buttons to adjust the volume.
Models |
|
Keywords |
|
Related documents |